TEXTILES.ORG
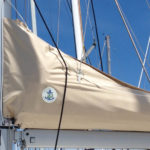
 Lazy Jack – stack pack sail covers

Click on the images in the gallery below for a step by step guide.
These names are some of the descriptions for a process of suspending sail covers.
I started making these Lazy Jack covers 20 years ago, as a progress/advance of the Lazy Jack rope system, designed to help flake a main sail as it is put away. The idea was to connect the rope to a sail cover to avoid having to remove the cover every time the boat was used. A few sailmakers and I had started making them by request; each one we made had small changes and became more functional as time went on. A sailmaker from Doyle Sails approached me one day and asked if he could copy some of my ideas, as he liked the way my covers worked. I agreed on the condition we swap ideas, as his shop was the only other manufacturer making improvements on each cover. We worked together for more than three years improving every one. As expected, others tried to copy our work with limited success.
Most of the original designs had removable front sections, which became annoying as many were blown, even lost, overboard. We then moved to either a front or side zip, and the excess fabric was tucked away on Velcro tabs inside the cover, as they are prepared for sailing.
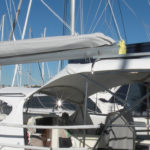
We still make some this way. Most covers are tracked at the aft side of the mast. This makes them much more functional and user friendly, as there is only one zip to open. We even sometimes incorporate the zip slide into a continuous-loop pulley system. This way you can stand at the mast and open and close the bag. This is very handy when access to the aft of the boom is restricted by high Targas or are just too high to reach. We use Ronstan 19mm bearing pulleys for smoother deployment. There are different types; some can be screwed directly to the mast. The rope we use is a 6mm pre-stretch. At the bottom of the sail cover we run 12mm-1/2-inch PVC pipe between the two layers, through which the rope runs. This stops any friction on the continuous-loop system.
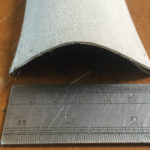
The covers we build are all Sunbrella acrylic canvas and are fully lined with mesh. This adds strength for the rope pull points. It stops abrasion from the corners of the sail when flaked and effectively stops the wearing to the Sunbrella and allows breathability. Breathability is very important to stop mold on the sail. As a further benefit, this adds a second layer where the batten is slid inside. The batten size we use is called Offshore 2 or 3, depending on how big the boat cover is. The No. 2 is 18mm by 8mm thick.
In addition, where the covers are mounted to the mast with track, sometimes we add a zip on one side to allow the owner access to the mast runners. The track mounting procedure is essential to add strength and stop corrosion between the track and the mast. We use 1mm VHB tape and Tef Gel on the screws to stop dissimilar metal corrosion between track and mast.
The covers are held to the boom with slugs. These are boom runners every 300mm, or 1 foot, apart. This adds a second tier of breathability and allows the release of water. Doing this also allows the reef points to sit where necessary without running them through the cover.
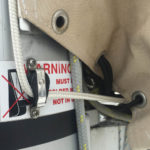
The main zip is a No. 15 Paskal zipper. Many of the original designs needed zip replacement regularly, mainly because of rough treatment. An upgrade was necessary for durability.
A zip on a sail cover is sitting flat, horizontal to the sun. Covering it is very important to eliminate UV degradation of the top zipper. Our solution is two-fold: First, the teeth are sewn inside each edge by 8mm (1/4 inch). Second, I make a molded acrylic cover flap, 60mm (2½ inches) wide. At the aft end, we add a 200mm zip extension. This is covered top and bottom to protect it from the elements. We do not use separating end zips on our sail covers. We use continuous zippers and again at the aft end. We use a canvas-to-canvas attachment version of the Stayput fastener. It is bolted right through the covering layers and next to the teeth on the zip. This stops the zipper from coming undone and acts as the stopper for the zip slide. PTFE lifetime thread is a must, and I have used it for 20 years on all my covers.
Early in my business I spent time analyzing failure points of covers. These are three-fold:
- Use lifetime PTFE thread.
- Where possible, fold edges and do not use binding.
- Properly cover all zips from UV.
In our local marinas, we have a very bad bird problem. Where most manufacturers carry the batten to the end of the cover, we stop them short of the end. We tailor the end of the cover down to a small opening. Doing this keeps the swallows and pigeons from nesting inside. In addition, we add extra eyelets in the gap between the track base and the start of the first slug, at the front of the boom. Lacing shock cord loosely between these eyelets stops bird access. If not used, birds usually find this access point quickly, which results in damage to cover and sail. We adapt the traditional look from a standard sail cover by placing a batten at the drop-off point. The drop-off point is the widest point of our sail covers. This method helps our sail covers shed rain. We believe most manufacturers create a water catcher by placing the batten too high.
I will be attending the 2017 MFA Conference in Jacksonville, and am always available if you have any questions. I am reachable on the Cover and Cushion Forum or by email. From time to time I will call to explain in detail.
David Elliott owns David’s Custom Trimmers in Brisbane, Australia.
-
- 1. The cover on which this article is based.
-
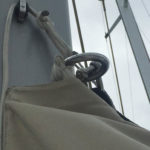
- 2. Mounting the top pully.
-
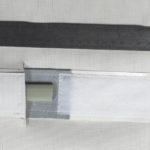
- 3. Mounting the bottom pully.
-
- 4. The molded zip cover flap.
-
- 5. Finishing the zip.
-
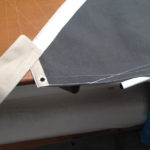
- 6. Where the batten finishes.
-
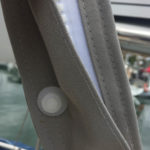
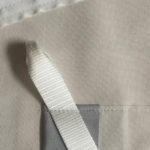
- 7. The leather and Velcro where the batten starts.
-
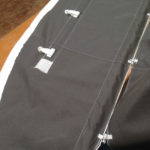
- 8. How the batten is supported and the boom runners sewn in.
-
- 9. The PVC tube through which the rope runs.
-
- 10. The boat our Australian 2014 regional workshop was based on.
-
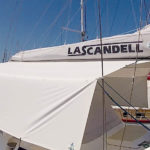
- 11. Boat names on sail covers.