Fabricating a bimini top visor
In our shop, we fabricate bimini top visors to a finished width of 2 1/2 inches. The actual finished width a particular shop uses does not matter for the purpose of this article. Visors are a relatively basic component in the fabrication of all tops that require the attachment of another top or enclosure panel. A thorough understanding of the curves and angles involved is important in quality canvas fabrication.

Let’s get started with the basics. Diagram 1 (above) shows three generic ways to fabricate visors:
1 is cut to the same curve as the top pattern. This generates a straight- down visor suitable for back drops.
2 is a straight visor, cut to the length of the curve of the top pattern. This generates a 45-degree angle visor suitable for angle backs.
3 is a reverse curve (hour glass) visor cut to the curve of the top pattern flipped over. This visor requires relief cuts in the hem area to make it match the end points of the top. This generates a straight-back visor, suitable for attaching a camper.
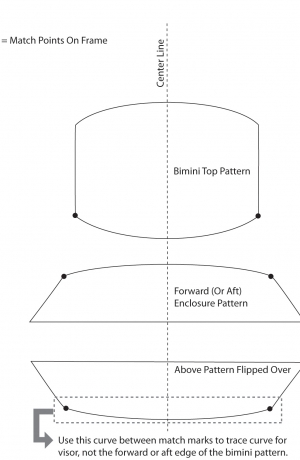
Diagram 2 (above) shows a custom visor, or what we refer to as the Flip Trace Method. This method allows the creation of the perfect visor angle. We think of it as the key to high-quality enclosure fabrications. This method uses the forward or aft enclosure pattern’s top edge for the curve of the visor, and not the top pattern curve. It is important to have match points on the frame fore and aft that mark the bottom edge of the bimini on each side.
We use 1-inch masking tape on the frame for our match marks, which allows us to feel the edge of the tape through the Tyvek we use for patterning. It is important to flip the forward or aft enclosure pattern over before tracing the curve for the visor. This is where we derive the name “Flip Trace.” The match points transferred to the top pattern and the aft and forward enclosure patterns show where the top and the visor end and should meet.
It is important to note two things. First, you still use the top pattern for the curve of all the bow pockets; just the visor gets the Flip Trace from the enclosure tops. Second, the visor angles will not look like they should fit together correctly with the other pieces; you just need to believe that they will. You will need to staple and make relief cuts to the visor to accomplish putting together the bimini, pocket and visor assemblies.
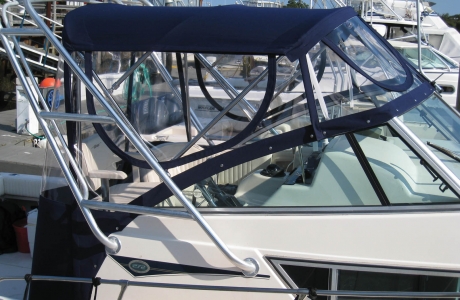
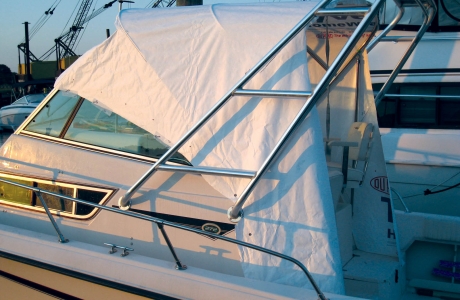
Photo 1 (above) shows a new Hood Raised Enclosure on a Grady White walk around using the Flip Trace Method. Note the clean, unwrinkled look of the visor set to the exact angle of the forward enclosure.
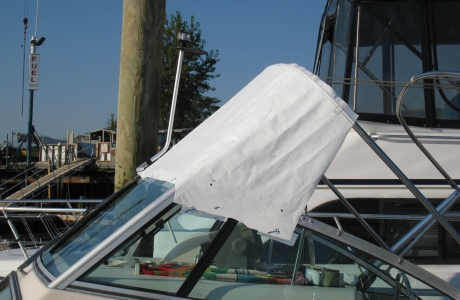
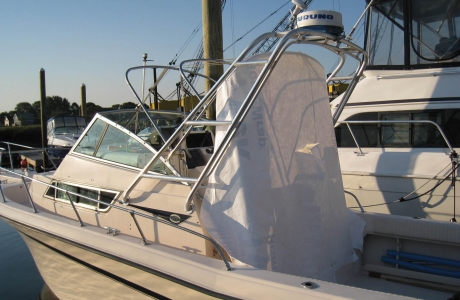
Photos 2, 3 and 4 (above) show the patterning involved to utilize the Flip Trace Method in fabricating the Raised Enclosure. The Flip Trace Method allows “one off” bimini and enclosure patterns. (I will go into detail on this subject in an upcoming article.) It allows us to make a pattern for both the bimini and enclosure with one trip to the boat. If you had a large boat that you wanted to do the bimini and enclosure in two steps instead of the “one off” method, you need only do a quick trace with pattern paper fore and aft to establish the angle and match points for the Flip Trace. When you return to the boat to install the bimini and make the enclosure pattern, you can stay stitch the enclosure bottom zippers onto the pattern material and zip onto the installed top. This makes the enclosure patterning portion go quick—even in windy conditions—and gives you the perfect visor angle of the Flip Trace Method.
Mark Hood is owner of Hood Canvas in Merrimac, Mass., mark@hoodcanvas.com.
 TEXTILES.ORG