TEXTILES.ORG
 Patterning a California dodger
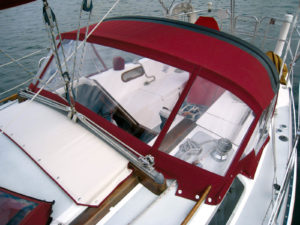
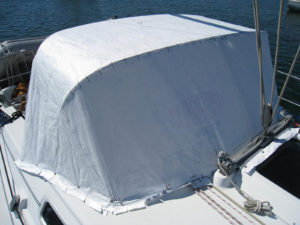
A Hood California dodger on a Catalina 30 sailboat.
At Hood Canvas, we use a 10-inch radius bender for our California dodgers. This produces a squarer frame than our more rounded 18-inch radius traditional dodgers. The style provides more room under the dodger, as well as superior ventilation and visibility for the helmsman.
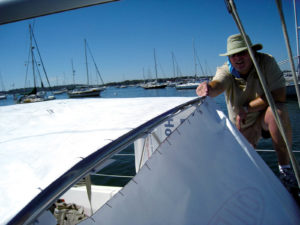
At the sailboat, set up your frame, install the deck fasteners and tension the frame with a strap down the middle and forward. We like to use stanchion bars aft instead of straps. We usually place the forward strap under a deck fastener with the screw going through the strap.
We begin by patterning the forward panel, starting at the center line. Then we work each side, alternating back and forth until we reach the edges where the side curtain will connect. We never use pony clamps, as they get in the way of our patterning technique.
In the next issue, we will cut, fabricate and install the dodger.
California Dodger: Start to finish
 At the top of the forward pattern blank, we trim our pattern close, make a couple of slits and tape it to the frame.
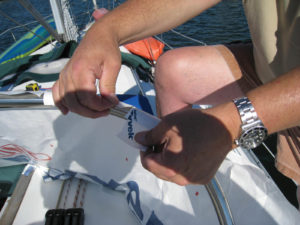
 At the bottom, we screw our fasteners through the pattern to hold it in place. A piece of duct tape on the backside of the pattern at the fastener location reinforces it.
 Next we apply a strip of ¾-inch double-sided sticky tape on top of the forward pattern from edge to edge.
We now apply another strip of double-sided sticky tape to the bare metal of the aft bow. You do not need masking tape underneath, as some fabricators will tell you. It will peel right off as long as you do not use high-tack tape.
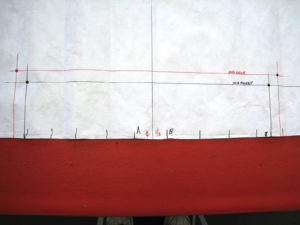
 We have stuck our one-piece top and side-pattern blank onto the sticky tape between the frames. Start at the center line and alternate, so the pattern lays flat down each side. Secure with fasteners at the bottom of each side. Draw a line on the aft bow holding a consistent 45-degree angle to the top of the bow along the entire aft edge.
Trim the top pattern blank close to the edge of the seam tape. Take a marker and draw another 45-degree line along the entire forward edge. This takes some practice and a steady hand. It helps to use a finger on the top of the bow as a guide and steady the line.
 This is a rear view of the paper dodger with the aft bow line drawn at the correct angle.
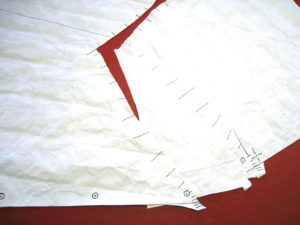
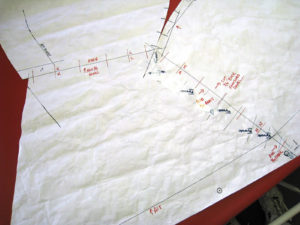
 This is the forward view of the paper dodger. Notice the hash marks drawn along the forward bow seam. Also, notice the hash marks where the two patterns meet. These hash marks are important for proper alignment during pattern development and sewing the forward seam.
 This is the final step, and it requires a steady hand. Using a break-off point knife, slowly cut the pattern along the forward edge. You will be cutting through two layers of paper, so bear down, but not too hard going over the strap. It splits apart as we cut, yielding clean, matched edges for seaming. This is the reason we do not use seam tape to hold the top edge of the forward pattern. Take the rest of the pattern off the frame and head back to the shop to start the pattern development process.
 We have cleaned up the bottom edges of the pattern below the fasteners and drawn our top-panel and side-curtain dividing line on the pattern. The two pattern pieces are in position to have the corner hash marks matched and joined into one with tape.
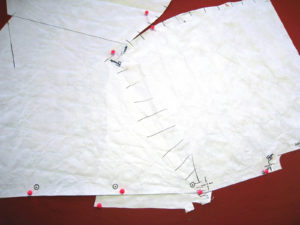 Here the pattern pieces are matched by pinning them flat.
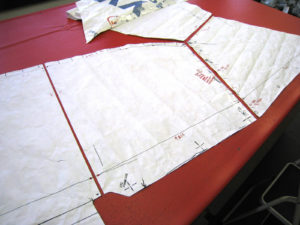
 The two pattern pieces have been taped together and the side curtain forward edge has been extended down to the base of the dodger. Notice that hash marks have been drawn on the two edges of the side curtain that connect to the forward and top panels. Also notice that these edges have a notation to add ¾-inch of clear vinyl for our overlaps using our large binder.
 The center roll-up window division has been marked and cut along with the side curtains. You now have six separate pattern pieces for fabrication. Notice that the lines have been drawn and punched as to where the fabric will be joined to the clear vinyl. There is fabric joined to the clear vinyl at the top and bottom of the three forward panels and just at the bottom of the side panels. Two sides of each of the three forward panels and three sides of each of the two side panels will be finished using our large binder.
 This is a photo of the marking for the forward bow pocket and reinforcement patch on the top pattern.
In the next issue, we will cut, fabricate and install the dodger.
Mark and his wife, Deb, own and operate Hood Marine Canvas and Hood Marine Canvas Training Workshops in Merrimac, Mass. For more information and to purchase the large binder seen in these articles, visit www.hoodcanvas.com or e-mail mark@hoodcanvas.com.