 TEXTILES.ORG
 Self-pleated bench seats from scratch

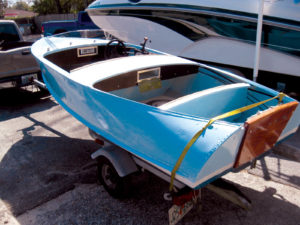
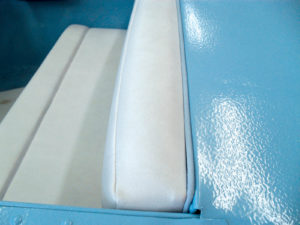
The finished bench seats in a 1957 FeatherCraft.
If you do any upholstery in the marine industry you will use a pleated vinyl at some point. Customers often request that I not use pleated because they want something that is easier to wipe clean and doesn’t have all the grooves in it. But the pleated vinyl provides visual interest as opposed to flat, white vinyl.
We are all familiar with pleated or channeled vinyl that we can purchase from our suppliers, but, what if you need to match a specific color and must pleat your own? I have used several different methods to pleat special colors. I don’t believe that there is only one way to do it, but some techniques are easier and quicker than others.
I had a customer bring in a 1957 FeatherCraft that he was restoring. The boat had no upholstery in it, and the customer wanted something that would keep the vintage look. The first stumbling block was the light blue color that he had used to paint the boat. In addition, the customers had a special logo that they wanted embroidered on the seat backs. If you are ever lucky enough to get to the customer before the project begins, try to get them to pick out the upholstery fabric first, and then match the paint to the fabric.
The deciding factor on the design had to do with the size of the two small bench seats. I had to think small, yet I wanted to make them appear larger than they were. The design came to me fairly quickly, and with the customers’ approval I began.
We cut new marine plywood and firm foam, and proceeded to the fabric. Once I determine the size of the center panel, I divide the balance of cushion width by the size of pleats I would like to have. The size of the pleat that I wanted to end up with did not divide evenly, so I intentionally left the two outside pleats wider. That ensured that I would not have a pleat seam interfering with the end cap.
Although there are numerous other ways to work around this little issue, choose the solution that helps complement the cushion. I could have changed the size of the center panel, changed the size of all of the pleats, or used a larger pleat somewhere other than where I did.
All the pleats in this instance are individual pieces with ¼-inch sew foam attached to each one.
Once I have all the pleats and center piece sewn together, all I need to do is determine the actual size it needs to be. Because of the amount of slack that the pleated vinyl creates, you will want to pull some of it out to get the true size.
So, how do you know exactly how hard to pull on the fabric? Remember that we have a board that the skin is going to be stapled to. We are going to use the board. We know what our seam allowance is going to be, so stretch the pleated fabric across the board and clamp. Don’t forget to let your seam allowance hang past the board.
The top of the backrests are attached the same way. By stretching the top piece of the cushion—the piece with the embroidery on it—and clamping on to the board, I can staple the two together. Now I can run it through the sewing machine without any doubt that it will fit like a glove.
The perfect fit is having the outside seam line the exact size of the board. If the skin is larger than the board, you will have wrinkles. If it is smaller than the board, you will have the wooden edges trying to poke through the vinyl.
Photos: Start to finish
 The boat was brought in with no upholstery at all.
 The rear bench seat was a mini version of the front bench. I wanted to be sure that the two looked good together before I started to cut or sew.
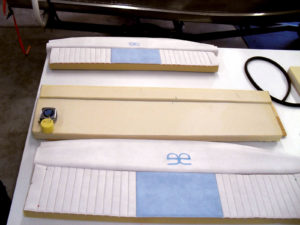
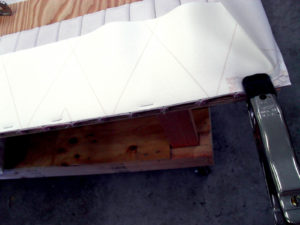
 To determine the correct size of the pleated panel, lay it on the board.
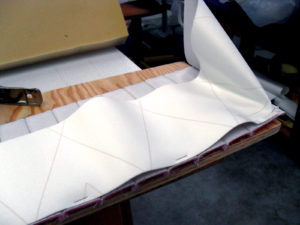
 Stretch the skin across the board and clamp it in place. You can trim it smaller or add another strip at this point.
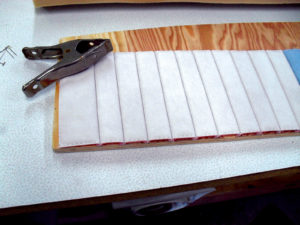
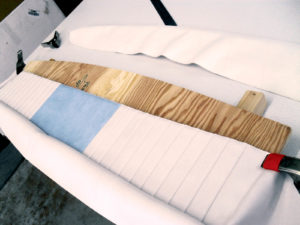
 Once you determine that it is the size you need, go ahead and staple on the boxing.
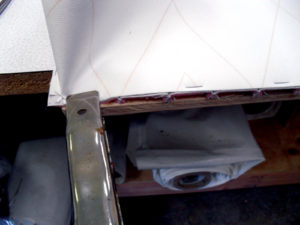
 Note how much slack there is in the edge piece once you release the clamp from the pleated piece. Go ahead and sew it together.
 Now clamp the pleated piece to the board again. Stretch the next piece of the cushion on top and clamp in place.
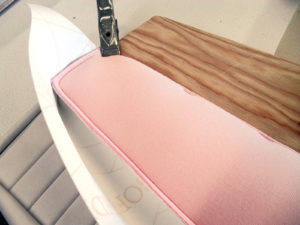 Staple the two pieces together and sew. This is also where I am going to add the stretcher.
 Add the cord for the finishing touch and install in the boat.
Carol Racine is owner of Racine Design in Jacksonville, Fla.