TEXTILES.ORG
 Proper frame design
 The frame is the foundation of your boat top. It supports the canvas top and all other canvas that will be attached to the top. The frame adds tightness to the canvas, which helps water runoff and the tight look of a good top. A strong frame shapes your top and counteracts the effects of wind, waves and people on the boat. If the frame is poorly designed and is not strong enough, the top will perform poorly.
Good design always starts with knowing what your customer wants or does not want. It is up to you to make sure that you are both talking about the same thing. Lots of boaters call all tops biminis or covers. Make your customers describe what they actually want.
Find out how your customer uses their boat. Are they cruisers or fishermen, and how fast does their boat go? Is the boat used offshore or in protected waters? The answers to these questions will help you design the appropriate top for their use and will allow you to educate your customer about why one top is better than another top.
Find out the height of the tallest person that is normally on the boat and what is going to attach to the top. This will determine how high to make the top and allow you to maintain the flow of the boat. Remember that it is your knowledge that will allow you to design a top that answers all of these questions. A well designed top should always make the boat look better, not worse.
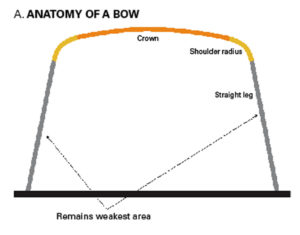
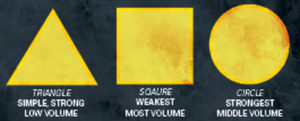 All design starts with three basic geometric shapes: the simple but strong low-volume triangle, the weak high-volume square, and the strongest middle-volume circle. These basic shapes have been used in construction for centuries, and we will incorporate parts of all three shapes into the design of the top. The square shape will provide the area needed under the top, but it is the weakest of the three basic shapes, so we need to keep the straight lengths to a minimum. We will add arcs of a circle to add strength to the corners (shoulders) and the horizontal span across the bow (crown). We will add triangles to straight vertical lengths to add side-to-side strength by making the base width larger than the shoulder width. One to three inches on each base side is enough to add side-to-side stability to the top (Figure A, Anatomy of a bow).
 Since we know that the straight lengths (bows) of the top are the weakest and that we want to keep those lengths to a minimum, how do we shorten the straight leg lengths? Since the frame height was set earlier in the design, the bow heights are also set in order to achieve a given height and length to the top. Therefore, the easiest way to shorten the straight leg is to increase the radius of your shoulder bend. Increasing the shoulder radius from 8 inches to 10 inches will shorten the straight leg by 2 inches. The next easiest way is to increase the height or radius of your crown. Since the bow heights cannot increase, the leg lengths must shorten. You can also split the base mounts, thereby shortening the bow reach of the main and secondary bows.
The next most important strength of a top is the properties of the bow tubing. The metal (aluminum or stainless steel), the diameter (7/8-, 1- or 1¼-inch) and the wall thickness (.049-, .065- or .095-inch) of the tubing used all determine the strength of the bow and the frame. When we talk about bow strength for frame design, we are really talking about deflection or bending under stress or weight. If a bow deflects too easily over a span or given distance it will not achieve what the design called for and the frame will fail. It will not keep the canvas tight, support the weight of the top or enclosure or withstand the abuse of the weather or boaters.
Leg lengths and the crown span between shoulders are the areas of most concern. The nominal wall thickness is .065 inches. The nominal shoulder span for 7/8-inch aluminum is less than 6½ feet. For 7/8-inch stainless steel it is 7½ feet or less, for 1-inch stainless steel it is from 6 to 10 feet; beyond 10 feet use 1¼-inch stainless steel.
 Tube strength
Tube strength is equal to deflection vs. span. I conducted a deflection test on different types of tubing. I set the span at 9 feet and added 25 pounds of weight to the middle of the 9-foot span for each tube (no crown). The 7/8-inch aluminum tubing deflected around 5 inches, the 7/8-inch stainless steel deflected about 2 inches, which means that the 7/8-inch stainless steel is 2.5 times stronger than the 7/8-inch aluminum tubing. The 1-inch stainless steel tube deflected about 1 inch and therefore is twice as strong as the 7/8-inch stainless steel tubing and 5 times stronger than the 7/8-inch aluminum tubing. The 1¼-inch stainless steel tube deflected a little over 1/2 inch, which makes it almost twice as strong as the 1-inch stainless steel tubing. Aluminum H2ube at 1-inch diameter was also tested and was similar to the 7/8-inch stainless steel tubing.
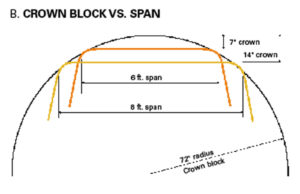
Although the shoulder bend is the strongest section of the bow, the crown is the main strength of the bow because of its large span. The other main attribute of the crown is the shedding of water off the top. In order to achieve water runoff, you need a slope of 4 to 5 degrees. This translates into 3 to 4 inches of crown at a shoulder width of 6 feet. In order to maintain this slope over a wider shoulder width, you must increase the crown as the span increases. My rule of thumb is 3 to 4 inches of crown at 6-foot shoulder width and add or subtract 1-inch of crown for every foot of increase or decrease in shoulder width. You cannot simply use the same crown for all widths of a frame.
If you use a crowning block to crown your bows, you must have several different radius blocks. And although the crown height increases as the span increases, the increase is not uniform and increases quickly (Figure B, Crown block vs. span). And although the strength of the crown increases as the crown height increases for a given span, the resulting look will not be pleasing unless you like the Conestoga wagon look.
 Another important design criteria is the angle of your bows in the frame. The maximum crown effect is with the bow standing straight up; since this never happens, we are losing crown as the bow angles over. By the time the bow is at a 45-degree angle, you have lost half of the crown effect of your bow. In effect, a bow that had a 4-inch crown now is equivalent to a 2-inch crown. This is called the Aspect Ratio of the top. The Aspect Ratio is the length of the top divided by the height of the top. A number less than 2.0 is acceptable, a lower value is better, and above 2.0 you should consider redesigning the top. The normal number should be between 1.3 and 1.75. As the number increases above 1.8 toward 2.0 you should increase your crown by one inch.
The rule of thumb for the span between bows is 36 inches or less, with a max of about 42 inches. There are exceptions usually having to do with angle and shape, such as on a convertible top going down to a windshield.
 There are two common misconceptions about the span between bows. The first is that since too long is bad, then short spans are better. This requires more bows, which adds weight and can shorten or eliminate the straight leg to make the frame impractical. The second and most common mistake is that bow spans should be equally spaced across the frame length.
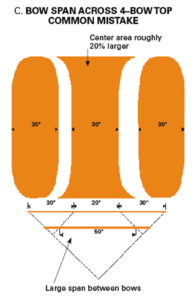
This mistake is most critical on a four-bow bimini that is equally split. The split is only equal at the center line of the bows and changes quickly as it moves to either side. The typical hour glass canvas section between the mid bows is roughly 20 percent larger than the other two sections supported by the main and secondary bows and their corresponding mid bows (Figure C, Bow span across 4-bow top, common mistake).
This larger area is more susceptible to wrinkles, looseness and collecting water. The other two sections, because of their opposing bow for support and their smaller size, will be much tighter. The split should be larger across the main and secondary sections by roughly 2 to 3 percent, and shorter across the mid section to make up the difference. This will produce a more balanced top (Figure D, Better bow span across top).
 The equal bow span split on a three-bow top is similar, but less drastic. The section supported by the main and mid bow will be 10 percent less than the remaining section. Although this is not a large problem on an ideal three-bow top of six feet or less, it does become more of a problem as you start to stretch the three bow beyond six feet toward seven feet in length.
Summary
The frame is the foundation of your canvas. Even with great sewing, a poor frame design will result in a poor job. Use the correct materials and design the frame with fewer straight lines and more curves—and always be aware of the aspect ratio.
Most importantly, know what your customer wants and how to design and construct the project correctly. And know when to walk away from a recover job. You’re not only building a strong foundation for a top, you’re building a strong foundation for your business.
Tom Hunter, MFC, is owner of Clearwater Canvas Inc. in Bellair, Fla. He holds a B.S. in engineering from Northeastern University and is creator of EZ Frame software and author of “Frame Design for Boat Tops.”
The ideal bow
- Stronger, more rigid, less deflection
- More curve, fewer straight sections
- Larger shoulder radius
- Even though a smaller radius is stronger
- Reducing the length of straight is better
- Increase crown
- This reduces the straight leg
- Increase tube diameter
- Keep aspect ratio low
- Split mount
- A shorter bow is always better