TEXTILES.ORG
 Fabricating bimini enclosure corners
I am going to discuss what we refer to in our shop as “natural intersections.” I have been on so many boats with gaps to the outside at the bimini corners. These gaps allow water to enter the enclosure, which is unacceptable in quality canvas fabrication.
There are many acceptable ways of fabricating canvas to address this problematic situation. Our method uses the standard 1½–inch width of the YKK #10 zipper as the overlap at the corner. The side panels extend onto the visor of the bimini where the curve at the top of the forward or aft panel meets the top of the side panels at the “natural intersection.” It is at this intersection on the visor that is the top of the vertical divisions at the corners.
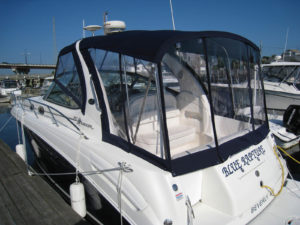 A Hood Raised Enclosure with camper. Notice the location of the aft corner division on the visor.
My previous article on fabricating enclosures should be read as a prerequisite to this article. Fabricators that have purchased our large 1½–inch finished binder should pay close attention. It allows you to use your binder to finish the top edge of your enclosures with a slight curve and no reverse curve. The binder will not work on a reverse curve.
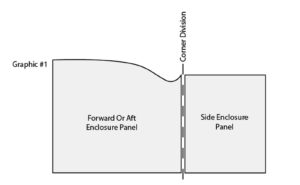 This illustrates the reverse curve method of fabricating bimini corners. In this method, the bottom of the reverse curve is going under the end of the bimini, creating gaps. I have seen Velcro used to hold the edge up and seal the gap, mostly on OEM canvas. Some fabricators cut the end of the pocket up slightly to prevent leaks. This works, but you still have the reverse curve to deal with.
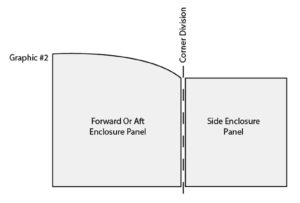 This illustrates our method of fabrication. Notice there is no reverse curve, and the corner division has moved onto the visor of the bimini.
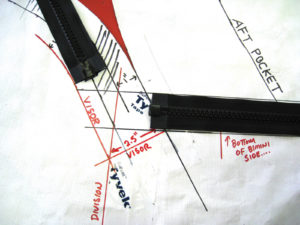 Notice that we have put our pattern pieces flat on the table so that our method might become clearer. You are looking at the forward “Flip Trace” pattern, side and top patterns together with the visor super-imposed on the forward pattern with a pen. You might be confused at first, but study it for a while and it will become clear. We have placed the zippers on the pattern to represent where they will be sewn onto the pieces once they are cut and worked up. Keep in mind that you are looking at finished sizes with no hems added at this point. Notice that the aft pocket is cut up 1½ inches from the bottom of the bimini side. Also, the tops of the two zippers extend out with a pen line to meet at a point on the visor. This is the point we refer to as the “natural intersection.” From this point down you will see a line marked with the word division. This is where your vertical division between the forward and side panels must start. Now, take note of the visor. Ours finishes at 2½ inches. So after the “Flip Trace” you need to cut 1 inch off the pattern for the finished size of the forward enclosure piece. Those fabricators that have our binder need to cut 1¾ inches off the top of the forward enclosure pattern, not 1 inch. This is because the binder will add the¾–inch of fabric back in when you bind the top of the enclosure.
 You are looking at the enclosure zipper placement on the inside of the bimini. Note two things. First, the visor zipper starts 3½ to 4 inches up from the end of the visor to allow room for the vertical division. Second, the zipper on the side of the bimini ends and back tacks on the visor seam. Fabricators that I have taught this method to initially think that starting a zipper would be hard as the frame exits at this point. I can tell you that it is not a problem as you can lift the edge of the bimini. It is actually easier and offers more support for the side enclosure.
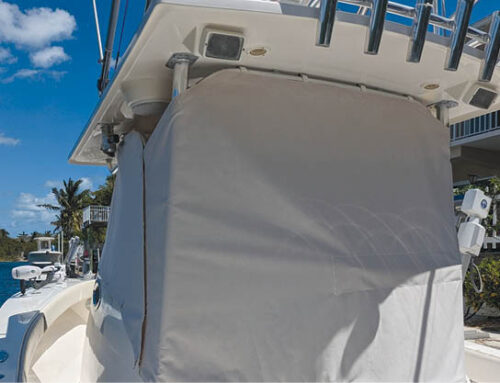
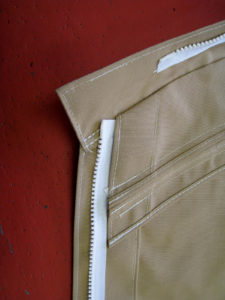
 This is the outside of a bimini corner with a fabric angle back on the aft end, instead of a glass enclosure. Note that the vertical division extends down from the visor and not down from the pocket area of the bimini.
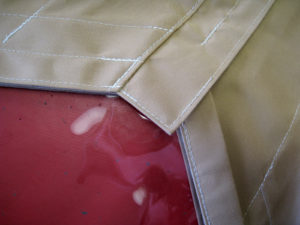
 The inside view of the same bimini corner. Note that with the 1½–inch overlap, the width of a #10 zip, there can be no leakage on these corners.
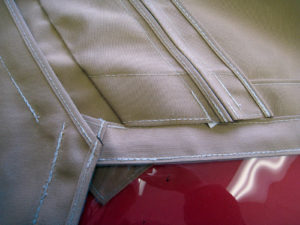
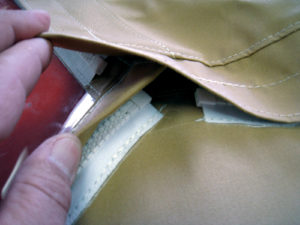 This is a view under the edges from the outside of the same bimini. Take note of all the overlaps.
Note: The large binder mentioned in this article and in previous articles is available for purchase at www.hoodcanvas.com. Mark Hood is available for private consultation and training.
Mark Hood is owner of Hood Canvas in Merrimac, Mass., mark@hoodcanvas.com.