 TEXTILES.ORG
 Center console covers
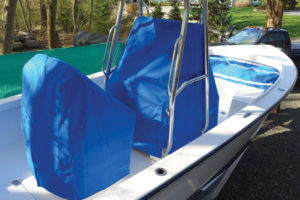
Photo 1:
Aft view of our completed console and seat covers. They taper to fit, and both covers have a zipper aft extending to the very top of the cover. These zippers are necessary with tapered covers so they can open like a clam shell to install.
As many of our students and readers know, we use Tyvek as our patterning medium here at Hood Canvas. We think of it as a reinforced brown paper. Plastic will expand, contract and stretch; Tyvek or brown paper will not. This effectively eliminates a variable in the build process. On non-tensioned loose-fitting covers such as binnacle bags or console covers, we use plastic so we can see through it. It makes the process of patterning easier on these loose-fitting items where temperature and stretch are not as critical to fit.
We have a process that involves using considerable fabric as we two-ply each of the four pieces—not as wasteful if you consider the cost of labor to reinforce around all the cover details. As a bonus, the cover is heavy and stays in place. Our customers like this beefiness and its resistance to abrasion. We like to taper fit all these types of covers and eliminate fasteners all together.
Most center console covers have four main pieces. We start the patterning process by examining the console to determine where all the seams and cutouts should go. Next we define these seams by placing 1½-inch-wide strapping tape onto the console and bridging gaps where need be. We also apply additional pieces of strapping tape to support the plastic when bridging gaps. This is our web to support the four pattern pieces as we pattern. We apply 3/4-inch double-sided tape to the face of all our strapping tape and remove the backing.
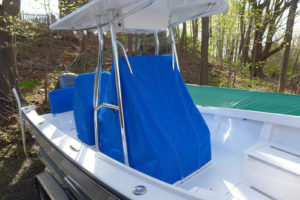
Photo 2:
Forward view of the completed covers. There are quite a few support cutouts. We save time using two-ply fabrication when this amount of reinforcing is required. We angled the forward support cutout zippers down at a slight inward angle to be aesthetically pleasing.
Starting with the forward piece of pattern plastic, we carefully place onto the strapping that has the double-sided tape applied. At this time we mark our support cutouts. When marking cutouts, we always cut in from the shortest side and use hash marks on the plastic. Hash marks prior to cutting plastic allows us to align and tape our cuts back together once around the support. At the top of our center console is a curved pipe; we will have our main seam follow this curve. We mark this curve on the plastic with a Sharpie marker.
Our next step is to mark all our seam lines directly on the plastic with a Sharpie. We use a straight-edge batten and prefer a series of dashes and hash marks combined. Now we place another layer of double-sided sticky tape on top of the forward pattern plastic on our seam line and place our side plastic onto the double-sided tape. We are overlapping our side plastic onto our forward plastic. Now we redraw the same seam lines and hash marks from the forward pattern onto the top plastic. We continue our seam marking and hash marks aft using our batten as a straight edge in preparation for placing the aft pattern. We add our seam tape on top of the new seams and place the aft pattern piece, overlapping all the three other pieces of plastic. Duplicate all the seam and hash marks onto the aft plastic by looking through to the layer underneath.
Some words of caution are in order. We use only black Sharpies and allow time for the ink to dry before adding another layer of double-sided tape. We take our time removing the four pieces so that the double-sided tape does not remove our Sharpie marks. Also, we make sure each piece has a dashed seam line and hash marks on three sides and that the bottom is marked where it meets the deck. There is a large dart below the steering wheel that we incorporate into our removal zipper. We like to tuck in below the steering wheel so the cover tapers to hold it in place.
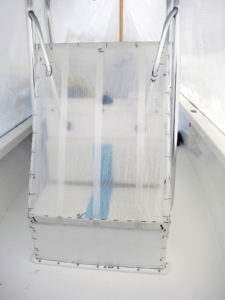
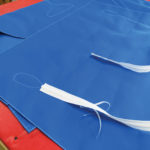
Photo 3:
Forward plastic template. Our strapping tape is supporting the plastic pattern in the middle in three places. On each side, bridging the gap between the top of the seat and the top of the windshield, is another couple of pieces of strapping tape. These will be our seam lines.
Back at the shop we work up our four pattern pieces using a straight edge to bridge and smooth the dotted seam lines made in the field. To these seams we add 5/8 of an inch seam allowance, but we only stitch in half an inch. This gives us quarter-inch of extra room on each side. We do this to avoid being too tight with the fit considering all the layers of fabric we are stitching and top stitching. We trim our pattern 1/4 inch up from the deck line as a minimum to allow for any sag of the cover.
We work up each of the four pieces in as much detail as possible prior to stitching the main seams. Proper sequencing is important so that we do not make extra work for ourselves. We use staples to hold the alignment of the two plies before we stay-stitch around the cutouts. Next we install our zippers down the middle of the stay stitching on the backside. Only after the zippers are installed do we cut just inside the stay stitching and around the cutouts.
The last step is to bind all the cutouts, but not the bottom edge—not yet. We do not want binding involved in the main seam; that would add too much bulk.
After we stitch and topstitch the three main seams, then we install our binding along the bottom edge of our cover. We used our large binder to add the main zipper over the wheel aft. In this way the overlap on the zipper creates a watertight seal over the instruments. The dart below the wheel has been eliminated and incorporated into the zipper. Our completed covers are tapered, and along with the zippered cutouts around the supports do not require fasteners.
Mark Hood, MFC, and his wife, Deb, own and operate Hood Marine Canvas and Hood Marine Canvas Training Workshops in Merrimac, Mass. For more information on the workshops or to purchase the large binder seen in these articles, visit www.hoodcanvas.com, email mark@hoodcanvas.com or Facebook.
-
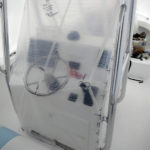
- Photo 4: Aft plastic template. Our strapping tape supports the center of the pattern at the level of the wheel and tucks in under the wheel. Another piece of strapping tape extends down to the top of the shift lever. There needs to be a dart from the shift lever to the main seam below to fit the contour.
-
- Photo 5: We are in the process of installing the support cutout zippers on the foward panel. There are two layers of the fabric with the edges, and the cutouts stay-stitched. We are applying the zippers down center line of the stay stitching. We stitch the zippers before we cut and bind around the cut outs.
-

- Photo 6: The four main components to our console cover. We will first stitch the two forward seams on the left in the photo. Then we stitch the aft piece around the other three panels. After the two forwards seams and the main seam are stitched, we add binding to the bottom edge of all panels.

