TEXTILES.ORG
 More to upholstery than sewing
By Don Racine
At many shops, the person doing the sewing is the same person who tore apart the old upholstery and will be the one who installs the newly sewn skin. However, in many other shops there are multiple workers involved in the same project. In this case, communication between the person sewing and the person stapling the fabric to the substrate is critical.
Because our sewing station is not in the same room as the installation process, we encourage everyone involved in an upholstery job to check with each other frequently throughout the day to be sure all is going well. The sewers may be the best in the world, but if the skins are not installed correctly the job will suffer greatly.
Hopefully the sales person recommended a fabric that is suitable to the job, taking into consideration if the project requires a fabric with a considerable amount of stretch or no stretch at all.
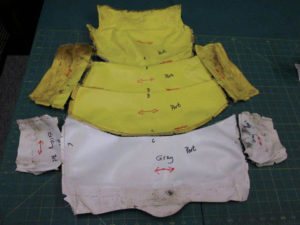
Picture 1
Before we remove the old skin, we mark every piece with directional arrows, like this: (Picture 1).
If you are working with a fabric that has very little stretch, some pieces will work better if they are cut on the bias, provided the pattern or grain will allow.
Pictures are extremely important to take throughout the process. As an example, the installer at our shop generally does not get involved in the removal process. He relies on pictures of the original upholstery and the notes we make to be his guide.
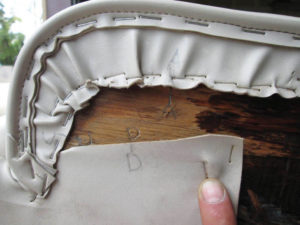
Picture 2
We mark specifics on the board (Picture 2), such as where hidem starts and stops, where the seams are supposed to land on the board. A huge mistake is to not make hardware correctly. While removing hinges, cushion stops and blocks and other hardware, it is important to take measurements or even make a template to show how everything gets reattached in the correct place.
When making new skins, we add about 2 inches to all edges that are going to be stapled down so the installer has something to grab and pull.
The sewer in our shop might trim some of the bulk fabric out of the seams, but we leave the final decision to the installer, who is generally the one that does the majority of trimming. We will also consult with the installer as to what he would like to have used as the internal cushion stretchers. (Stretcher is a term I learned from my old upholstering days, when I did a lot of residential work. Stretcher is the extra fabric sewn into the seam of a cushion so you can secure a section of the cushion to the board. Some people call them pullers.)
We have found that strips of Sunbrella make good stretchers for a number of reasons. First, it will allow air to move through, and it does not stretch out of shape. It is also easy to write on with marking pencils so you can draw a staple line to keep consistency throughout the seam. The time you would want to use vinyl for a stretcher is when you have an inside curve. Sometimes you need to allow a little wiggle room so the skin will follow the contour of the foam.
If you are leaving staples exposed on the bottom side, it is a good idea to try to make it look as neat as possible. It leaves the impression that the rest of the job was done in a neat fashion, too. Always put in a few temporary staples, flip the skin over and make sure you have it in the correct place before you begin to staple it permanently. We all have seen cushions that have hundreds of unnecessary staples that have to be pulled out. If the customer damages a cushion, you will probably be the one to take it apart for repairs. How many staples do you want to pull out? We use 1/4-inch staples for temporaries. We also use the 80 series stainless staples. We prefer the 80 series particularly for vinyl because of the larger crown. They don’t punch through the vinyl as easily as the 70 series, and they are easier to remove. The 80 series stapler has a longer nose making it easier to get into tight places. It is a good idea to have both sizes of staplers, since each has its place.
Once you have the skin location correct, you will also want to keep an eye on the fabric to smooth out the wrinkles as you go. Keep in mind any vent holes that are in the cushion. Don’t cover them with a fabric that can’t let air through.
Underlining is used by our shop anytime the cushion is in a position that it can be viewed by the bottom. That means a cushion that is on a hinge, manually lifted off, or a stationary cushion that might be visible from a lower plane of site—for example, the bottom of flybridge cushions or cockpit cushions that you can see when you are in the cabin. Often times if you take a little care in stapling the underlining in a neatly fashion, you won’t find it necessary to add hidem. But folding over the edge of the underlining looks better than a raw cut edge.
You should pay particular attention to placement of staples when you have a stripe of piping of a contrasting color. Solid-color cushions with the same color piping don’t show inconsistencies as do contrasting colors. Again, it is important to make sure the skin is lining up to the original marks you made on the board. We have had some cushions that have had notches cut into the side of the board so there is no mistake about where you need to place the piping.
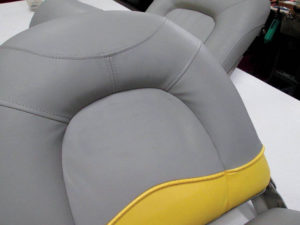
Picture 3
So you have the skins installed on the cushions. All of the marks you made lined up. Still you have a little wrinkling in spots (Picture 3). Now what to do?
This is when you reach for the heat gun or steamer (Picture 4). Small wrinkles can be removed and save you from having a grumpy customer. But caution: Too much heat, and you will be making new skins! Always practice on a piece of scrap. Too much heat can cause a variety of undesired results. You need to know when enough is enough, and realize that some wrinkles are never going to come out.
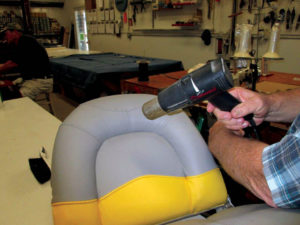
Picture 4
You can easily cause the heat-treated area to burn or discolor, make a shiny finish dull or a dull finish shiny. You may cause the texture to disappear or distort. You may cause premature aging in that portion of fabric and the result would be cracking long before it should have. Always start with the heat gun temperature setting as low as possible.
When I need to tidy up a cushion with heat, I will gently smooth the fabric and put light pressure on the wrinkle. Use a smooth cloth or leather gloves for two reasons: First, you don’t want to take a chance of leaving an impression on the vinyl; second, it’s going to be hot! You may not notice immediate changes. Let the piece cool for about five minutes and gauge the results. More often than not, the wrinkle will be gone. Sometimes, however, you might have to repeat the process. I can’t stress enough how important it is to try the heat on a scrap of the same material the cushion is made of. Patience and practice will allow you to correct little details on each cushion (Picture 5).
I have also found that ice can help with this technique. Heat the wrinkle with the heat gun to the desired temperature. Place some ice in a plastic baggy, or use a gel pack inside a baggy to cool the surface more quickly. Always use a baggy that has no writing on it or the ink may transfer to the upholstery.
There is only so much this little trick can fix. If you cannot get rid of the wrinkle within a few tries, stop and consider the alternative—it might be time to rebuild this skin.
Remember that one bad wrinkle will bring the quality down a notch as far as the customer is concerned. This will also make the customer begin to scrutinize the rest of what you did.
Don Racine owns Racine Design Inc. in Jacksonville, Fla. www.Boatclinic.net