Designing and building a new seat from scratch

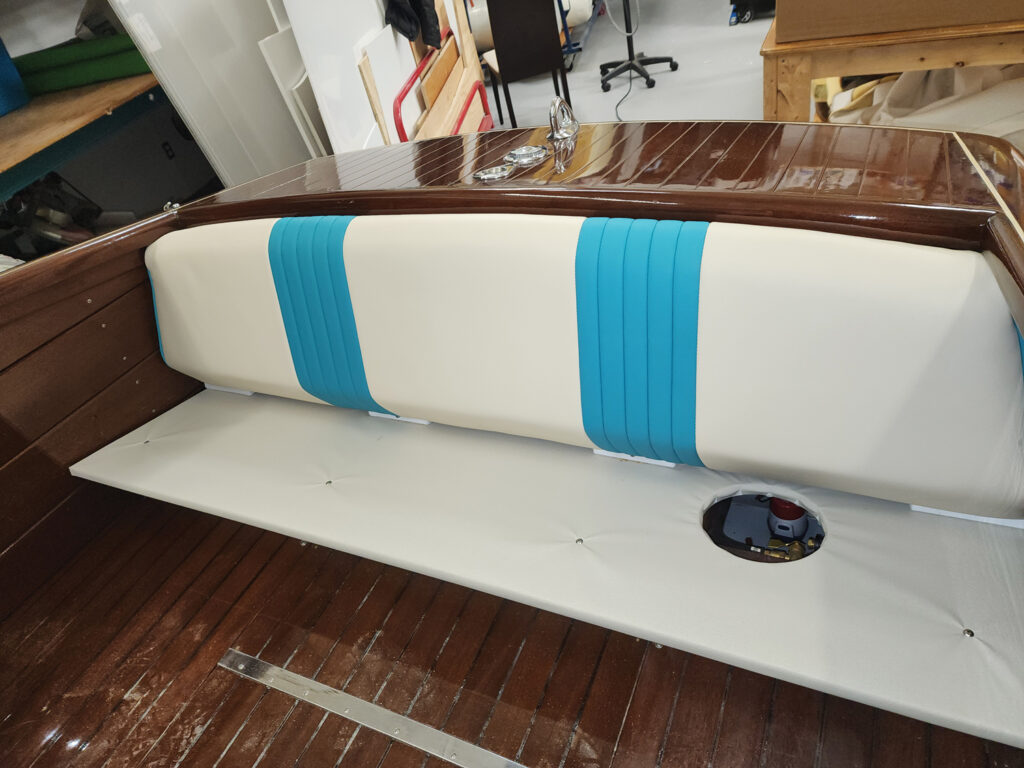
Where do you begin when you have a blank slate? We recently had a 1949 Shepherd 18 come through our shop. The client had undertaken a full restoration of the vessel and wanted to add aft bench seating. Many of us do a lot of upholstery recovering—copying the old to create the new—but what do you do when you have no seat structure?
Start with the existing design
We took our design inspiration for how to shape and build the new aft bench from the existing front bucket seats. The bucket seats had seat cushions with rounded front edges that slanted aft back toward the bases, and the thickness tapered aft to create the bucket feel. We drew the angles and shapes from those cushions on a piece of Coroplast® corrugated plastic to visualize that shape aft in the boat where the bench would be. We had a design constraint with the fuel tank in the back of the boat, so the angle of the back structure had to avoid that component. Test-fitting and trimming the Coroplast mock-up let us quickly and efficiently determine the basics of the structure.

Build the seat base
We wanted a robust seat base structure, so we fit a ¾-inch plywood structural base onto a ¾-inch front riser that would be permanently mounted into the boat. The seat base would also be ¾-inch plywood so the seat would be extremely strong when it was stepped on to enter the aft seating area.
The riser was attached with four stainless steel angle brackets to the floor joists. Later in the process, we cut holes to provide access to the systems installed beneath, then upholstered these pieces to keep everything clean and tidy.

Shape and fit structural components
Next, we shaped and fit the backrest board, again using ¾-inch plywood. We installed cheek blocks onto the fixed base to set the back angle and to give us a fastening point that was below the cushion line. This would allow the backrest to be removed to inspect the fuel tank and fittings behind it.
We then fabricated the ¾-inch plywood seat board. It projected forward of the base structure to mimic the design of the front bucket seats and give an openness to the floor area. It would be held in place by screws installed from underneath, and by fingers that nested into the seatback board. The fingers control the alignment so that once upholstered, the colored pleat sections would consistently line up between the seat and back sections. The fingers also provide vertical stability because the board can’t cantilever when someone stands on the front edge while stepping into the seating area.

Taper and fit the foam sections
We determined the thickness and angles for the seat based on the bucket seats. For the backrest foam, thickness and taper were based on developing the best fit for the boat, covering a gap in the side planking near the top and keeping a nice-sized seat. We did a test with some foam blocks to make sure we had a comfortable slope to the back in relation to the seat. We mitered the back/bottom edges of the two pieces of foam where they came together so the seat and the back would wedge together in a nice, clean fashion.
Placement of pleated panels
The client had provided a design concept for the bucket seats that had a colored roll and pleat panel in the middle of the seat and back. Based on the dimensions of that seat, we determined the roll and pleat section would have five pleats that were 1 ¾ inches wide. Although the bucket seats were receiving one section of pleated panel in the middle of the seat and back, with the aft bench being the full width of the boat, we determined that we needed two sections of pleated panels in the accent color, so we needed to figure out their placement. We had made the panel sections for the bucket seats already, so we laid those over the bench and back and adjusted their positions to develop the preferred layout. We then recorded the spacing and transferred that information onto our patterns.

Patterning process
Although we are a digital company and do all of our large projects via Prodim and CAD designs, for a small set of cushions, it is faster to get out the pattern plastic and take a physical pattern. Traditional skills are always valuable! The seat and back tapered in width from front to back for the seat, and top to bottom for the back. The build plan for both pieces was to have a top/front section that wrapped around to be stapled behind/underneath, and two end caps with a piping accent.
We lightly marked the foam with some match marks to align the curves and tapers of the components. We were building these cushions with ¼-inch sew foam on the vinyl, so given the size and shape when we faired our patterns, we added ⅜ inch at the seam lines, then stitched with a ½-inch seam allowance. We have found this method to work very well for providing a nicely tensioned and shaped cushion. For larger cushions, sometimes additional deductions are needed, but for small and midsized cushions, we have had great success this way.
A team effort
The team at Precision Custom Canvas Inc. enjoyed having an opportunity to see how cushion shapes can be developed. They were given input into panel placement, and everyone inspected and evaluated the design as we moved forward. I knew we would be using this project for this article, so I took the opportunity to educate my sewers on all the processes I was using to develop and execute the project.
Roll and pleat tips
A trick for making consistent and straight roll and pleat in an efficient manner is to take a large panel and stitch the pleats without cutting individual sections. This prevents the pieces from shifting as you sew. For example, for 2-inch pleats using a ½-inch seam allowance, stitch at 3-inch increments to set the folds. For a five-pleat panel, cut your piece 15 inches (5-by-3-inches) wide. Once you stitch the fold lines, hinge the material good to good on the fold seams and stitch a ½-inch seam allowance. This will create 2-inch pleats.
We prefer to remove the extra seam allowance, trimming away roughly ¼ inch so the pleats lay flatter. This system not only keeps pleats very consistent, it is also fast. We use ¼-inch sew foam. You may need to experiment and adjust sizes if you are using a different thickness of sew foam, but the process will remain the same.
Jeff Newkirk, MFC, is the owner of Precision Custom Canvas Inc., located in St. Catharines, Ont., Canada. He has been a canvas and upholstery fabricator since 1997 and started Precision Custom Canvas in 2014. The company has grown from a home-based business to a 2,500-square-foot shop and showroom in 2016, and to 5,000 square feet in 2022.
 TEXTILES.ORG


