Selling the vision with rendering techniques

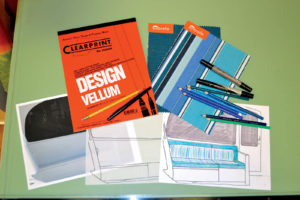
I zoomed in on the mezzanine seating area in this photo for the basis of my drawing.
We will never know the true total, but sometimes I wonder how many jobs are lost just because a customer couldn’t envision a project? I think fabricators and designers take their own visualization skills for granted and assume the general public has the same visual library on which to draw. To bridge that gap, we need to provide a complement of visual aids, such a sketches, portfolio photos and product samples, to get our customers on the same page and sell the project.
Photos of past projects are great, but sometimes a customer can get hung up on the differences between the project in the photo and theirs and stall out. For this very reason, I like to take a photo of the customer’s actual project and use that as the jumping off point for my sketch. Also, this way you can render in different fabrics for a truly custom vision.

All the “tools” you need to complete a custom rendering. No computer needed!
So for my low-tech rendering technique all you need is the ability to print out an 8-by-10-inch photo and trace paper. When taking the photo that will become the basis of my sketch, I like to shoot in perspective. Basically I get a nice angle, not straight on, because this is easier to draw and it conveys more information, particularly if you are working with a corner. If your project involves patterned fabrics, it is good to have the samples laid out when taking the picture. This gives you a good approximation of the scale of the repeat, and acts as a reference when you are ready to render fabrics.
Next print the photo, and lay clear trace paper or vellum over the top. I outline key elements with pencil to get a framework on which to base my freehand sketch. Once this base drawing is made, pull off the trace and see how it reads. Sometimes you need to add reference points by tracing other elements such as cleats or windows, but don’t clutter the drawing by tracing in unnecessary objects, like a bottle of sunscreen that happens to be on a shelf. When you’re happy with the amount of detail captured, go over the lines with a black pen or marker and erase the pencil.
Now that you have perfected the base drawing, make sure you scan it or at least make a paper copy. This way you have a consistent background if you are going to present your customer with a few different options for either the fabric or the cushion design. It’s also nice to have a copy of the base work if you happen to make a mistake while working freehand.
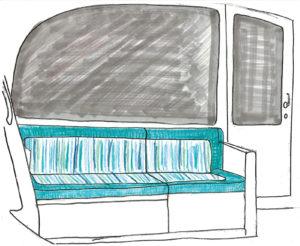
When drawing in your cushions and rendering the fabric, don’t get overly concerned with minutia. This is just a representation of design decisions so there is a way for you to communicate your intent to your customer. You want to be able to answer questions like “Which way will we run the stripe?” or “Does the bolster turn the corner?” Your portfolio photos and samples will complement the sketch to convey your level of craftsmanship and the material properties.

My finished rendering of mezzanine cushions on a Viking yacht. I wanted the drawing to convey the cushion design and fabric application.
I also find that the sketch is a good exercise for the fabricator because it forces you to think about design and fabrication concerns at an early stage in the process. Also, when you present a concept drawing to a customer, you have a document of the planned design and eliminates any costly misunderstandings that might normally surface only after fabrication. But most of all, drawing is just another skill that gets better the more you practice, and as visual thinkers it’s a great medium in which fabricators can communicate with their customers.
Rebecca and Trevor Kennedy own Kennedy Custom Upholstery in Ocean City, N.J.
 TEXTILES.ORG


