TEXTILES.ORG
 Upholstered wall panels
Multiple door panels require extra attention to measuring and hardware placement for a smooth appearance and proper operation.
By Terri Madden
Most likely, you will be reading this article as warmer weather streams across your state and your customers delight in contacting your marine-fabrication business with new challenges. If you have never had the opportunity to fabricate wall panels, consider a customer request as an opportunity to add to your skill set, your “toolbox.” Why? Boat interior hulls of every size and shape have some type of surface treatment that requires finishing detail. The visual surface most likely will be wood, laminate, wallpaper or padded panels. Padded wall panels are esthetically pleasing; they can provide protection as well as sound and heat insulation. And, panels can be easily removed for repair and/or replacement if they become damaged. Generally, no sewing is required.
This article will be a guide in determining where to start, what materials are necessary, and how to provide solutions for a timely and profitable product. As with most marine fabrication projects, a request for new wall panels is either cosmetic—such as when a boat is bought or sold—or when an owner realizes the existing materials are moldy, discolored or abraded. We have had requests for all types of panels and accompanying detail work, including accent topstitching on the perimeter of the panel.
A major consideration is budget, what “look” your customer envisions as opposed to what you can offer for their vessel. Yacht designers showcase vertical panels one year and horizontal panels the next. And recently, panels have been separated with handsome wood trim. Determine if the panels will be flush mount, side by side or will be set individually within a frame.
-

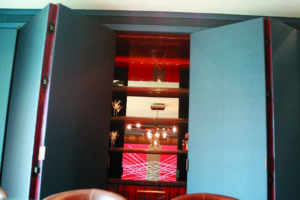
- Velcro helps hold padded door panels in place midway through construction.
-
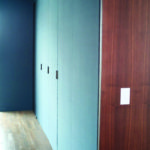
- The multiple door panels close to form a flush wall.
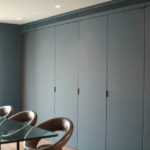
(See left photo above. “In-process” side-by-side panels are checked for fit within a frame.) Will you need to replace only the covering on the existing panel, be replacing water-damaged panels and surface material, or patterning to fabricate and install new panels for the first time on the vessel? (See installed low-profile vertical panels in open position photo on page 35 and closed above right.)
Our first wall panel project encompassed replacing wallpaper with horizontal panels down five stairs from the salon to a curved hallway with four cabin doors on a 50-foot Bertram. The unforeseen obstacle was removing the handrail, as the visible cap nuts and screws would not detach, and it required access to remove them from a portside guest cabin wall. This alone added significant hours to the project.
Tools to have on hand
- Circular/jig saw
- Tack/claw hammer
- Staple gun/staple puller
- Stud finder
Basic wall panels – approach and evaluate
Traditionally, a padded vinyl is wrapped and stapled around ¼-inch wood or PVC panel. These panels are held “in place” via heavy-duty Velcro or panel fasteners. Velcro allows for easy installation, replacement or removal when access to electric cables, AC vents etc. is required. When using panel fasteners, consider the spacing, size and weight of the panel to hold up against the jostling and size of the boat.
Determine who will prepare the area if you are making new panels and verify if other contractors are working inside the vessel in order that your access is coordinated. Decide which system you will use to adhere the panels to the surface. Make a small sample to verify height next to doorframes or trim, as this can prevent any unforeseen obstacles. Consider the difference between a thin silk versus leather or a 30-ounce vinyl; add foam height, and know that each sample will be slightly different. Perhaps a 1/8-inch panel is needed, or a 3/8-inch would be a better fit. It’s a good idea to display these samples in your shop and use them to show new customers.
Vinyl with foam backing is frequently used over panels. Vendors such as Covin Sales and Converting and Majilite offer extensive selections of vinyl patterns that can be laminated with stock foam thicknesses in a range from 1/16 to 3/4 inch, with a 5-yard minimum order.
Do not attempt to laminate material to foam by yourself as it is practically impossible to get 100 percent contact, and any separation will bubble and be quite noticeable when the panels are mounted.
Allocate enough time
If you are making new panels, schedule sufficient time to prepare the area by removing all furniture or trim if necessary. Use a stud finder in areas that might prevent installation of panel fasteners. Pattern areas and record details and measurements for all areas; double check and record a number sequence for both port and starboard panels. Frame out the areas for Velcro or fasteners and indicate these locations on your patterns. Determine the spacing between panels this way: 1/8-inch foam + vinyl = thickness on a panel edge. When the panels are side by side, you need to multiply the thickness by 2 to get the space needed to allow between panels. This may require a 1/4-inch or more of spacing between adjacent panels. Consider ordering PVC panels pre-cut from your supplier for accurate edges, or be sure to check the cutting blade on your saw and how it will affect the finished edge. An extra trip to the boat is recommended after panels are cut to verify multiple panels for adjustments and final fit of all edges prior to covering.
When ordering and cutting vinyl or fabric, add 2 inches on each side of length and 2 inches on all sides of width (a total of 4 inches each) prior to cutting the vinyl for sufficient material to wrap and pull to the back of the panel for stapling. Practice corners by folding and notching the material at panel edges so there is no overlap. If you are using heavy-duty 1-inch Velcro on the panel back, consider using 2-inch heavy-duty Velcro onsite for 100 percent contact. After stapling, cut any extra vinyl away so the Velcro is mounted next to the vinyl; that way the finished panel mounts will be as flush to the wall surface as possible. Occasionally, decorative screws are used to secure panels “in place” on a vessel, though we have never used this system.
The completed padded wall features construction that can also be applied to bed headboards and padded walls for sound systems.
During your evaluation, the fastening system was determined and now mounting fasteners like Velcro are stapled on the back of a panel after the panel is covered. Other mounting fasteners, such as fast mount and Christmas trees, need to be in place prior to the panel being covered. Be aware that the spacing between staples is important as most manufacturers do them almost side by side to keep consistent tension. Check that the size and length of the staples you are using are correct for the finished project. Staples that are too long could pierce through the face of the vinyl when pressure is applied. If you are using 1/8-inch PVC, be aware that a 1/4-inch staple may be too long and will need to be stapled in at an angle. A 1/8-inch panel is not a typical size, yet on a low-profile door project we covered with fine silk we had to be extremely cautious and placed staples one right next to another to prevent visual ripples. We inserted the staples at an angle to hold the material in place, as well as to prevent the tips of the staples from protruding the fabric surface.
Understanding, researching and applying various wall panel systems for a finished look will provide an additional level of expertise for the marine fabricator. Additionally, other applications using these same techniques can be utilized for upselling as a project for your customers on locations such as headboards and padded residential walls for sound systems and door panels.
Terri Madden owns Sand Sea & Air Interiors Inc. in San Juan, Puerto Rico. www.sandseaair.com