TEXTILES.ORG
 Planning a 40-foot yacht cover with no snaps part two

“Nopkehee” 40-foot Andreyale yacht is covered for the winter.
This article is a follow-up to the one I wrote in the May/June issue of Marine Fabricator in which I discussed the project plan our team utilized to meet the customer’s request for a full boat cover for a 40-foot Andreyale yacht. The boat is the property of the Peninsula Yacht Club in Cornelius, N.C., and the project was initiated by Harry Smith, the marina manager.
Design challenge recap
The design challenges of the project were threefold: the cover had to be secure, able to properly drain water and able to maintain the appropriate tension. The big limitation was that there were to be no fasteners of any kind installed on the boat itself. Our team and the marina manager came together to discuss options for the points of attachments on the boat.

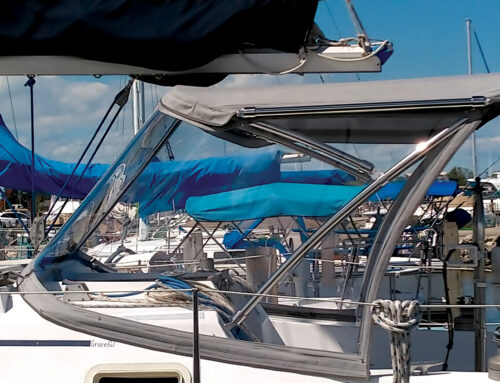
Tension is achieved for the forward section by pulling from the bowsprit to the base of the masthead.
These points were the bowsprit, stanchions, handholds and masthead base. The options we discussed included sandbags, vents with poles for support, 1-inch webbing on the handholds, and release buckles to hold tension.
Construction concerns
The cover was constructed in three sections. Assembling each section had to be consistent with where the cover fit onto the boat. With such large pieces of fabric required for the sections, sewing in the center of the section had to be addressed first. We worked on assembling the section to the outboard edges. In order to move these large assemblies through the sewing machine, we placed the bulk of the fabric on small dollies and moved them down the table.

Additional tension is added to the forward section by using the handrail base. (Note the boat blanket sewn in place over the teak handrail.)
We left the shop with the completed sections of the cover folded from outboard to center. This allowed us to carry each cover section onto the boat and unfold it as it would lie on the boat. It was critically important to mark all sections in detail regarding where the connections would be placed and, of course, which was fore and aft. This eliminated a lot of labor-intensive work and wasted time and energy.
Getting attached
We first attached the forward section of the cover over the bow area, using the bowsprit as the forward mast point of attachment. The aft end of this section was located at the masthead base, which allowed us to pull tension from the bowsprit. In addition to the tension forward to aft, we added sandbags to the outboard edge of the cover to pull downward tension on the fabric. We then discovered an area between two dorade vents that would collect water. To help smooth out the horizontal area to allow for drainage, we added an 18-inch pole with a vent to raise up the cover.

The middle section is held in place by downward tension using the stainless steel grab rails.
To make connecting and tightening the fabric easier, we used 1-inch webbing with side release buckles on all sections of the cover. One-inch webbing on the handrails and at the base of the stanchions fore and aft was used to gain downward tension on the fabric. In addition, all of the 1-inch webbing was reinforced with 18-ounce vinyl patch material to distribute the force at the pull on the fabric.
Soft boat blanket is used in many areas to protect
the varnished teak, including the lower skirts that touch the hull of the boat.
Protecting the boat
Another of our concerns was the possibility the fabric would chafe against the newly applied varnish. To prevent this, we used a polyester soft blanket material at all contact points where the varnished teak would be touching the cover. We also used this material along the hull where the lower skirt portion of the cover touched it. This added weight to the skirts to minimize lifting and also protected the new paint on the hull of the boat.
All of the fastening items used to attach sections to provide tension and weigh down the fabric were hidden under the cover. Protecting these fasteners will allow for many years of trouble-free use and prevent degradation by the sun’s UV rays. This includes the zippers used to attach the skirts to the upper section of the cover.
We achieved our goals and met the customer requirements within our established timeline. While the custom cover was a challenging project, we will apply the experience we gained from this project to other custom work with similar requirements.
Rick Berkey owns Rick’s Custom Canvas and Sail, Cornelius, N.C.
www.rickscustommarinecanvas.com

1.5-pound to 2-pound sandbags were attached with side release buckles along the edge of
the cover to create static tension on the cover.