TEXTILES.ORG


Frame bending basics

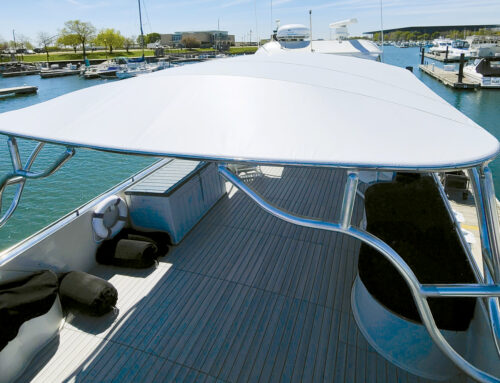
There are many different types of frames that are used in the marine fabrication industry — some common, others not so much. Some shops only work off existing frames, others mainly build one type of frame and some shops like ours end up building all kinds of frames.
I’ve been designing and building various types of frames for about 25 years now, so I wanted to share a few things I’ve learned on both what to do and what not to do when building a frame from scratch.
Important tools and types of frames
One of the most common tools used in building frames is the BendARC bender and crowner, or similar type of wall- or table-mounted bender. This setup is affordable and can be used to build many different types of frames — I started out with this setup and still use it from time to time. I actually mounted one on the side of my truck so that I could make adjustments and build frames on site if the project is out of town.
A powered crowner is a really great tool to have as it allows you to easily do compound curves. A floor mounted jig is also useful when building larger frames as it allows you to pattern a big top in your shop, not 30 feet up in the air on some giant boat. I mainly build three types of frames: the folding frame or scissor frame, the rigid frame, and the cantilever frame. For this column, we’ll dive into the first two types.

Folding frame measurements
The folding frame is one of the most common types of frames used in our industry and is probably the easiest type of frame to measure up, design and build.
The key measurements you need to get at the boat are the mounting width, mounting height off deck, height of top of frame at center, and shoulder width and overall length fore to aft. A very important consideration when building a frame that is going on a flybridge is the camber of the deck. For example, if the deck is 4 inches higher in the center than at the mounting points on the sides, it’s going to affect your height measurements if you are setting it up on a jig at your shop.
Another important consideration when building a frame is how much crown, or camber, you are going to put into it. Here in the rainy Pacific Northwest, I like to put quite a bit of crown into my tops. I consider it cheap insurance against the possibility of water pooling somehow in the middle of the top. We all know that spells disaster for any bimini top — with so much rain, it’s important for water to shed easily. I also like the look of a top that has nice curve to it.
When calculating how much crown we are going to put into our bows, I generally add an inch for every 20 inches of width. For example, if I want the shoulder width of my frame to finish at 100 inches, I will add 5 inches to my width calculation. If the bow is going to have a compound curve, we add a little more to the width depending on how much of a curve we are going to put into it.

Unique needs for rigid frames
Another type of frame we commonly build is the rigid frame, as in it’s rigid and it doesn’t fold. These are generally roughed out at the shop and then custom built and fine-tuned at the boat.
For these frames, it’s good to have the bending equipment on site or have the boat at your shop. For most rigid frames, we use fittings to assemble them with the occasional weld if needed. Most of these frames can be built using T-fittings, elbows and deck fittings so they can be assembled on site.
Once rigid frames are all bolted into place and flexed correctly, they are extremely strong and won’t blow apart heading into the wind at high speeds. I always drill through the key fittings and through-bolt them so there is no chance at failure or a fitting coming loose. I also add a drop of blue lock tight to the set screws on the fittings that are not through bolted. With a basic bender and a bunch of fittings, the possibilities are endless.

It’s all in the technique
In speaking with other fabricators about technique, I’ve learned some people like to orient the stainless tubes in a certain direction before bending. Stainless tubes have a seam running lengthwise down the tube, and you can feel where it is on the inside of the tube. Some fabricators like to put that seam on the inside of the radius, and some on the outside.
I think that it depends on how the tube has been stored, and I think that tubes have a certain “memory” to them. I like to put one end of the long tube on the edge of the table and the other end on the floor, and whatever way it rolls or wants to sit, that is the inside of my radius. We call it the Canadian Curve because some guy from Campbell River, B.C., showed me that trick and it works great for us!
A conversation I’ve had with many different fabricators is whether to use pockets or straps to support mid bows on a multi bow frame. I’ve seen really nice work using both methods. We like to use straps to support the mid bows pulling from the fore and aft. I make a sort of compression strap that can be slightly adjusted over time if need be.
I feel that when you use pockets to support the mid bows, it’s almost like the pockets are trying to pull the mid bows down to a certain degree. If you use straps and pull off the fixed fore and aft bows, the mid bows are completely supported separate from the bimini top. We also get heavy snow from time to time, and I think the straps help with overall structure. We make a sleeve that covers the strap and matches the bimini material.

Having fun with frames
I really enjoy getting creative with frame design and fabrication. It’s one of my favorite aspects of our trade. My advice to anyone starting out with frame fabrication is to start simple and remember that you can always cut a little bit off a bar much easier than adding a little bit.
It also might be a good idea to play around with some conduit or other cheap tubing to figure out your exact calculations for your bends. Keep in mind that different gauges of stainless tubing will have different spring back characteristics, and always mark the center of your bows. We actually use a pipe cutter to put a slight score in the middle of our bows.
Hopefully fellow fabricators will get a spark of some brilliant idea for your next project!
Greg Keeler is the owner of Oyster Creek Canvas in Bellingham, Wash. He loves boats and is always striving to come up with innovative designs for marine canvas. He will discuss frame bending at the 2027 Marine Fabricators Conference in Nashville, Tenn.