TEXTILES.ORG
 Covered smile windows

Inside view of a Hood Track to Track Enclosure on a Tiara 36. Notice how the tucks on the inside edge of the “smile” windows are barely noticeable.
At Hood Canvas, we put a storm flap over all our “smile” windows. This is important because if you do not, they will leak, especially if they are on an angle. We use a #10 coil zipper on all our smile windows, as they are self repairing. We also use double sliders on each smile window, so a small section can be opened for ventilation purposes.
Smile windows: Start to finish
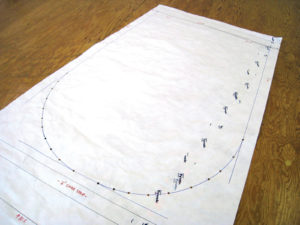 This is our pattern with the smile window marked on it with a Sharpie marker. We punch holes along the length of the smile so that we can transfer the center line marks of the smile to the window vinyl underneath. We also use the pattern to transfer the center line marks to the fabric used to make the cover flap.
 We make radius templates out of Mylar— so we can see through it—at 12-inch or 16-inch curves, depending on the width of the panel. These radii allow smooth zipper operation. We make our cover flaps 1½ inches wide, which is the width of the zipper. You must add 3/4 inch to each side of the smile center line on the fabric so the cover flap will cover the zipper. The Mylar pattern must have the center line drawn on it with a marker so it can be lined up with your punched smile center line on the fabric in order to draw the inner and outer curve on the cover flap fabric.
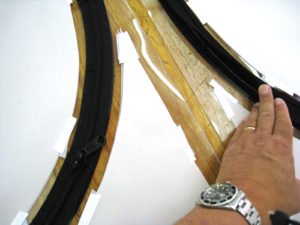
 This is the layout of the smile windows on the fabric. I forgot to take a picture before they were cut, but you should get the general idea. In most cases, they nest up pretty well so that very little fabric is wasted, especially if the smiles vary in width. It is very important that you add 2 inches to the top of each smile to allow for adjustment when installing. It is also important to label each smile with a white marker so you know which smile cover flap goes with which window panel.
 We now bind the inner and outer side of each cover flap with 3/4-inch binding. Keep in mind that this is a single-ply cover flap.
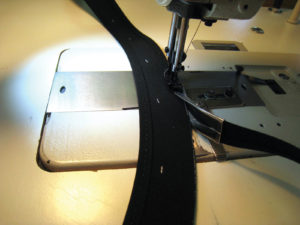
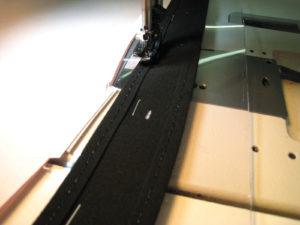
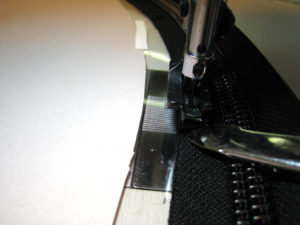 We install the zipper on the inside of the window vinyl. Allowing for a little zipper overhang at the top of the window, start on the inside edge and begin stitching. Be sure the center of the zipper follows the center line that has been drawn on the window vinyl with a white marker. As you start to turn onto the radius, use a staple puller and push a little pleat into the inside edge at uniform intervals so that the outside edge of the zipper lays flat without too much tension. Now stitch the outside edge of the smile zipper. This should go fast as it now lays almost flat going around the radii. We have seen some fabricators heat cut relief slits on the outside edge of the zipper to relieve the tension going around the curves, but we do not believe this looks finished and takes more time.
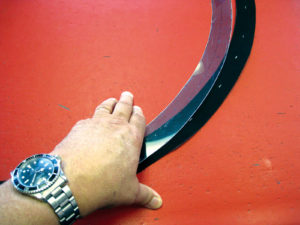
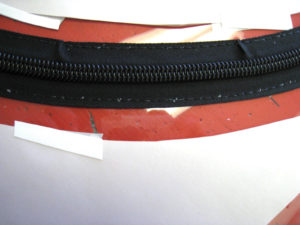 A close-up of a section of the zipper with a couple of material pleats in it along the inside edge as it goes around the curve.
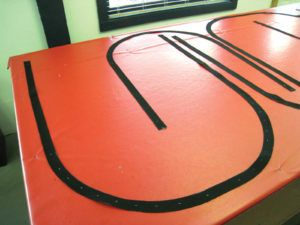
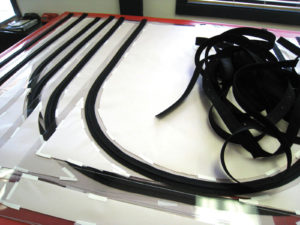 The stack of smile windows with zippers installed, and finished cover flaps ready to be installed.
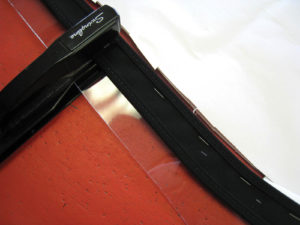 The cover flaps are now stapled with a long-arm stapler to the outside of the window vinyl. It must cover the zipper installed on the inside of the window vinyl. This is where the extra 2 inches at the top of each side of the cover flap is needed to account for any small adjustments in alignment.
 Starting at the top inside edge, stitch the cover flap on each smile. Stitch on the binding stitch line and remove the staples. Do not stitch the outside edge or your window will not open. In the case of a “frown” instead of a smile, stitch the cover flap on the outside edge and leave the inside edge unstitched.
 Split the zip on each side of the smile slightly and install a slider on each end to close the zipper. Now stay stitch the zipper and the top of the cover flap together at the very top and trim even with the glass. It should be noted that we use single-pull sliders only, as no one ever opens a smile from the outside.
 This is the completed smile window with cover flap installed. It is now ready for adding the top, bottom and sides. With our 1½-inch large binder, this is accomplished in short order for the sides and top.
Before you go to the boat to install, you must cut open the vinyl on the center line of the smile. We cut ours open by making a shallow slit with a seam ripper to make a starting hole. Cut the rest open by placing the tip of a pair of scissors in the starting hole and rip open by pushing on the scissors with the very tip, not quite closed. You now have a leak-proof, smooth-operating smile window.
Note: The large binder mentioned in this article and in previous articles is available for purchase at www.hoodcanvas.com. Mark Hood is available for private consultation and training.
Mark Hood is owner of Hood Canvas in Merrimac, Mass., mark@hoodcanvas.com.