Affordable cushion alternatives
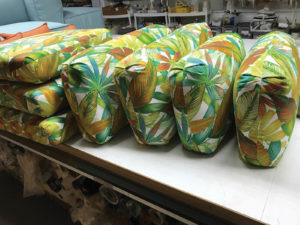
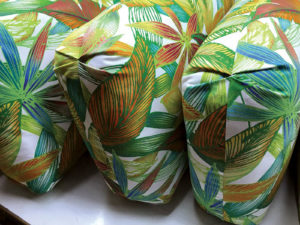
There are several cushion design options to offer a customer with a limited budget. The cushions shown here have butterfly corners, which resemble a boxed corner, but involve fewer fabrication steps, translating to a lower price point. This affordable and efficient solution allowed us to deliver a client’s project within an aggressive time frame.
It is often challenging to offer successful cushion design solutions when a customer wants a champagne look on a beer budget. Getting the answers to the following four questions during the initial client meeting can make all the difference in finding an affordable solution that leads to a satisfied customer:
- Who is the final decision maker? This may not be obvious, yet knowing this is critical to the success of the project.
- What is the scope and time frame of the job? Perhaps the customer wants a full boat refit—and wants the salon cushions delivered in time for next month’s vacation. Can your production team meet that time frame?
- What is the budget? This can be an uncomfortable conversation, but it is necessary. Knowing the budget up front will reduce customer frustration and prevent you from offering solutions that may be far out of reach.
- What is the value of this project to your customer? Is it to resell the vessel at the best price possible with the least investment? Is it an upgrade after an insurance claim settlement? There are many possibilities, and understanding the value will help you offer the best solutions to your customer.
A recent challenge
Sand Sea and Air was contacted by a new customer who lives outside of Puerto Rico. He purchased a sailboat with large salon areas consisting of spacious seating on both the port and starboard areas of the salon. Hurricane María had damaged the vessel and he had thrown away 24 cushions and wanted new ones by the following month when the family was leaving for a live-aboard summer adventure down island. He had purchased the vessel at a bargain price and wanted new cushions at the “best price” possible.
Old photos of the vessel showed lumbar seating that was not reversible and held “in place” while out at sea in wavy weather. This usually involves several fabrication steps, which translates to a higher price point for cushions. The primary challenge was to tackle this job in the most efficient manner possible to provide an affordable solution and deliver the project within the desired time frame.
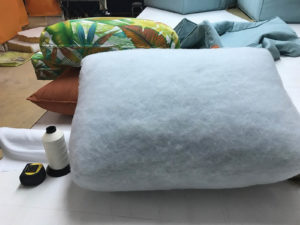
Everything a project requires adds to the cost. For this customer, we included marine upholstery fabric, UV thread, medium-density polyfoam for the seats, and for the cushion backs we chose to utilize smaller pieces of stock foam triple-wrapped with Dacron®. Depending on cushion size, you might consider purchasing affordable bed pillows.
Assess the variables
We had our client review a checklist of options to confirm his priorities, such as tie-down solutions so that the cushions don’t go flying on bumpy seas. The checklist was our guide to effectively planning an affordable and winning solution that was within budget, comfortable, easy to maintain and secure.
Based on our customer’s request to fill spaces that originally housed 24 cushions, we devised a way to fabricate a single cushion in an hour. Doing the math with a shop rate of $100, his cost was already $2,400 without the cost of foam or fabric. This is why knowing your customer’s budget is crucial to planning, fabricating and delivering a profitable solution. We budget our proposals to bring the cost of goods within a margin of 35 percent. Assessing all these factors allowed us to design a cushion that provided durability, comfort and style at a reasonable price that was also profitable for us.
Plan your cushion lengths to the size of foam sheets available in your area for the least joins or waste. Theoretically, from a sheet of 55-inch by 75-inch foam you can get six seat sections at 25 inches by 25 inches or four seats that are 25 inches by 37 inches. Fabricating four longer rectangle cushions takes less fabric and time than cutting and sewing six square cushions. Additionally, fabricating only rectangle cushions for the seat cushions is a more affordable option than intersecting corner cushions with diagonal edges at each corner, which involve considerably more construction time. Reducing the overall quantity of seat cushions to a total of five long rectangles rather than the original 13 helped us keep the budget affordable. To secure the cushions on the vessel, we included a 2-inch band of Velcro® across the bottom of the cover prior to assembly.
Use the tips in this article to provide seat and back cushions with corner details that reduce fabrication hours and translate into affordable and attractive solutions for your customers.
 High style on a budget
Boaters want to sink into a safe and cozy spot to enjoy their time at sea. So why not create back pillows that offer the comfort of a bed, yet look classy for family and guests? Boxed cushions are the most widely used cushions for residential furniture and boats. They are tailored and frequently include a welt or piping with the boxing sewn to the top and bottom pieces of square or rectangular cushions.
However, a mock box cushion provides a lot of style for very little effort. It looks like a box cushion, yet it does not have the separate boxing strip. The fabric top and bottom pieces are measured and cut to include the area for the boxing, and corners can have a short seam or corner stitch to create a tailored, squared-off look. Other corner options include butterfly corners and Turkish corners (sometimes called a gathered corner). Similar to a box cushion, the mock-box cushion can include a zipper welt with a bit of practice.
 Mock Box Corner Prep
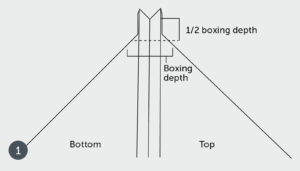
Image 1: To prep the basic cushion pieces, measure and mark with pins identical top and bottom pieces that are the exact size of the foam form (obtained from your pattern). On each of the four edges, add half the finished boxing depth. For example, the cushion foam form is 25 inches by 25 inches with a 4-inch boxing; this requires a 29-inch by 29-inch top and bottom piece for a cushion without a zipper, or add ¼ inch on edges where a zipper will go. Cut the two pieces, install the zipper, and then close the remaining seams, pivoting at the corners.
Squared-off corner
Photo 2: Separate each corner and ease open seams and align one seam on top of the other. Measure down from the corner half of the finished boxing depth, drawing a line across the corner, perpendicular to the matched seams; the length of the line should be equal to the finished boxing depth. Stitch securely across the line for all four corners. Option: Finish seams with a serge edge and/or topstitching.
 Butterfly corner
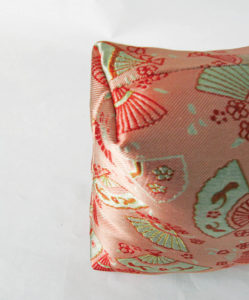
Photo 3: This corner is similar to the soft-box corner, yet it is less tailored and resembles a butterfly wing.
The corners are trimmed diagonally and then folded into inverted pleats. Measure in from each corner along the raw edge half the finished boxing depth. Mark these points and connect with a diagonal line. With the pieces together, cut along the diagonal line at all four corners. Fold to find midpoints along the diagonal, and mark these points with pins placed perpendicular to the diagonal edges. Separate the pieces with the right side of one piece up. At each diagonal cut, make two folds that meet at the center pin. Sew a tacking stitch to hold the folds in place and repeat at all four corners. Turn the cover to the right side and insert foam or Dacron® fill.
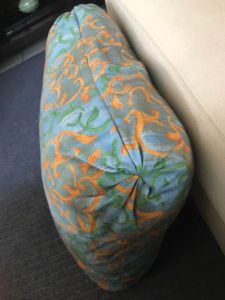 Turkish corner
Photo 4: Sometimes called a gathered corner, this corner has an exotic flair that is easy to make. Stich the top and bottom pieces as described in the butterfly corner, and secure the corners from the wrong side. Start at one corner and measure from corner stitching along each seam line half the finished boxing depth. Mark these points on the fabric edges. Repeat on the remaining corners. Use a compass or small bowl to mark a curved line connecting marks on both the top and bottom pieces (eight curved lines in all). Put one hand into the pillow and reach into one corner “cone.” With your other hand, run a small gathering stitch (using strong double strands of thread) around the circle formed by the curved lines of the two pieces, opening the seams as you come to them. After encircling the corner, pull the gathered thread tight, wrap it around the gathers several times, and take a few tacking stitches to secure. Repeat at the remaining corners. Do not trim or cut the corner. Turn to the right side and insert foam or Dacron fill, working the filling into every corner.
Terri Madden owns Sand Sea & Air Interiors Inc. in San Juan, Puerto Rico. www.sandseaair.com.
 TEXTILES.ORG


