 TEXTILES.ORG
 Tips for taking better photos of your projects
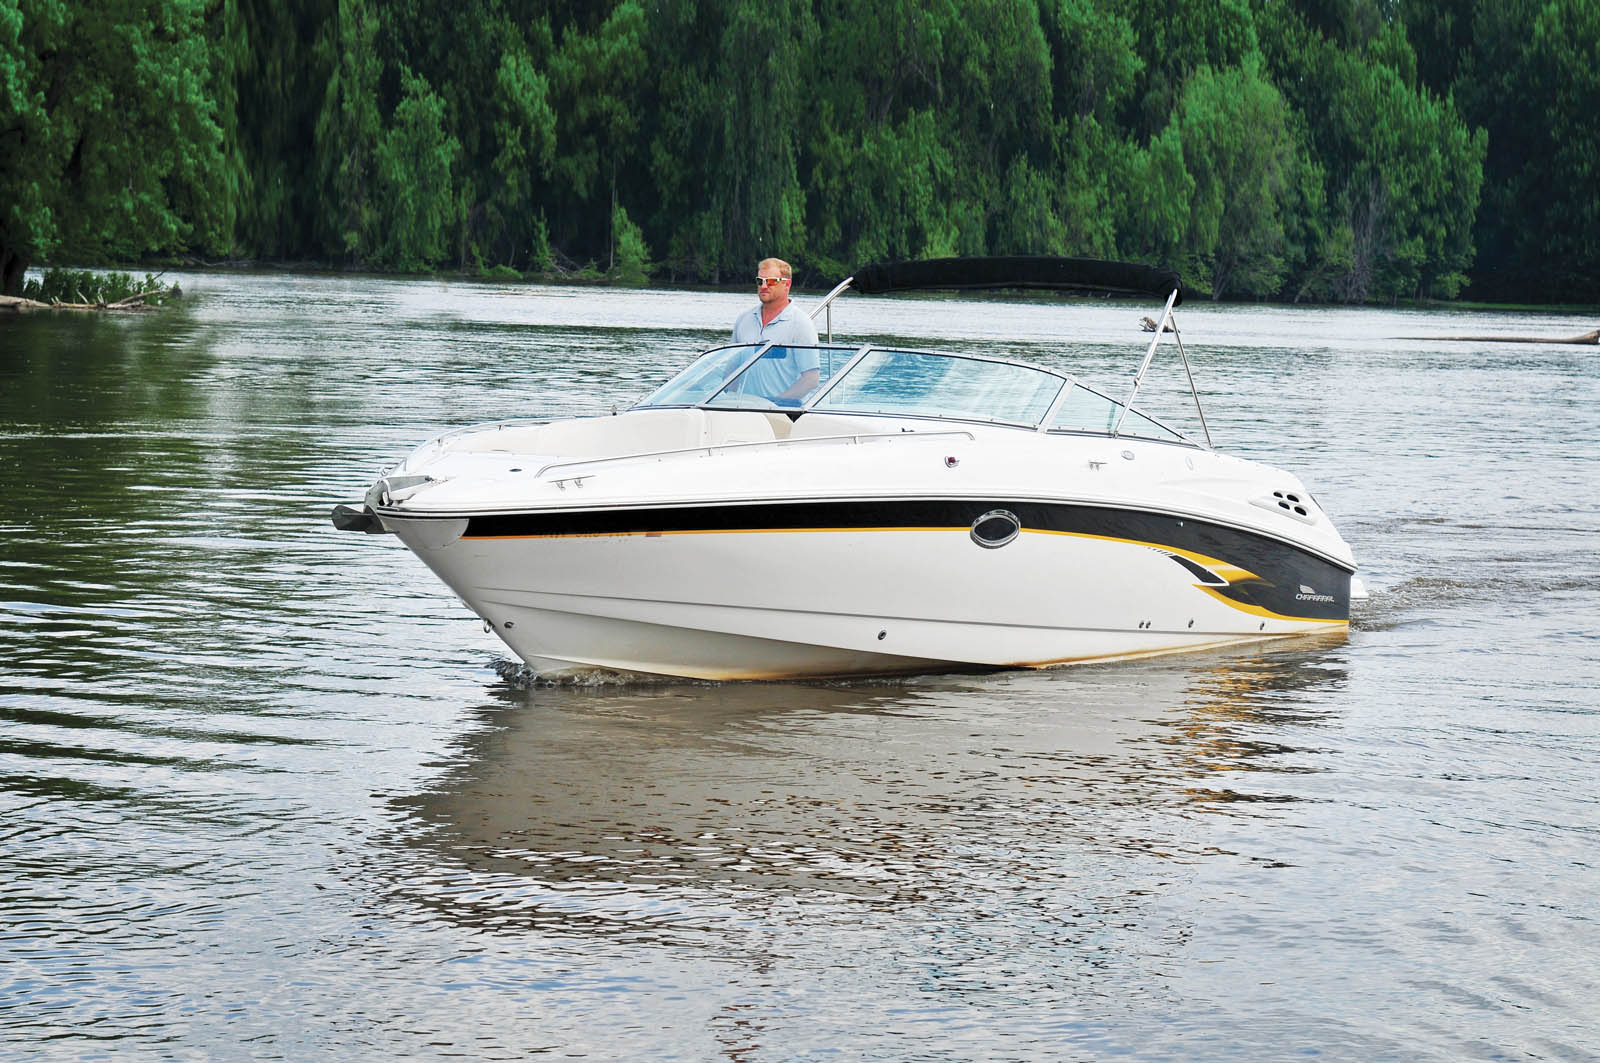
Here is an example of a good photo. You can see the whole boat. The background is pleasing and not busy.
Only have a smartphone? That’ll work fine.
An estimated 1.2 trillion pictures were taken across the globe in 2017. The smartphone, of course, is what’s behind the huge number. According to InfoTrends, a market research firm, 85 percent of all photos are shot with a phone.
A good smartphone gives you, as a fabricator, a simple way to capture the work you do, as well as all of the important (and not so important) occasions in your life. The catch, though, is that despite the improvement in smartphone cameras, a lot of photos taken with them just aren’t very good. Most of the time that’s fine; what you post on Facebook or other social media channels is meant to capture a moment, not establish you as a modern-day Ansel Adams.
However, there are instances when a fabricator wants a quality photograph to really showcase a project. This magazine is a good example. Photos are a critical part of its editorial presentation, and it often relies on examples of a fabricator’s work to illustrate articles and grace the cover. Ideally, there’s a fabricator project on the cover of every issue of Marine Fabricator, but that requires high-resolution and high-quality photos.
The goal of this article is to help you take better pictures. It will also include tips about what to do with those photos to make them suitable for publication—whether it’s in this magazine, in your own marketing materials or elsewhere.
I’m a published photographer who has exhibited work across the Midwest, and part of my job is to keep up with the latest and greatest techniques for shooting photos. This column is an opportunity to share some of my knowledge, but I’ve also consulted a veteran of the photography business, Dan Grevas, who has owned and operated Dan Grevas Photography in South St. Paul, Minn., for almost three decades. We put our heads together to come up with these suggestions.
 Tools of the trade

While smartphones are the ultimate in point-and-shoot, if you’ve been using a real digital camera—a digital SLR, a compact or something in between—and are comfortable and confident with it, by all means continue. Smartphone cameras have improved by leaps and bounds in recent years, but a stand-alone camera is still capable of taking the best photos. Such cameras do require a bit more skill than using a smartphone, so go for a smartphone if that’s easiest for you.
Any decent smartphone manufactured in the last few years should be adequate for most photographic purposes. What this publication needs, for example, are high-resolution photos: a file at least 1 megabyte (MB) in size for use inside the magazine, and about 6 MB for a cover shot. We’re not going to get too technical here, but the size of your photo is determined in large part by the megapixels that can be captured by your camera’s sensor (the more megapixels, the better). Current top-of-the-line smartphones such as the Apple iPhone® 8 and X have a 12 MP camera that can produce files large enough for most uses.
 One reason professional photos look professional is that they’ve gone through an extensive editing process. It’s true that editing software such as Adobe Photoshop® can bring out the best in a photo, but it requires dedication to master the art of photo editing, and it takes time that is probably better spent on the work you love (fabricating!). Your goal should be to get good shots right out of the camera. The question is: how do you do that?
Simple preparations
Before you shoot, make sure your phone is set to save the photos at the largest size possible; some smartphones will reduce the size if you’re running low on storage space.
Then use a soft cloth or a shirt and wipe off your lens. Most cell phone lenses have oil and dirt and dust all over them, and when you’re working with a phone, every little bit helps.
When you’re ready to shoot, pay attention—close attention—to what you see on the screen of your camera or smartphone. Don’t just point and shoot. Get the whole boat, or the element you want to highlight, in the frame, and show it from a pleasing angle. The best angle is often not straight from the side or front.
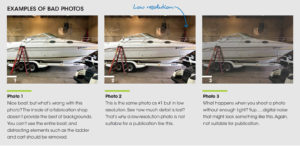
Eliminate unwanted elements before you shoot. Make sure there’s no ladder leaning against the boat or a pole near the edge of the frame. Don’t depend on cropping those items out later because that reduces the amount of digital “information” you have to work with.
In many cases, the presence of a human being can add immeasurably to the appeal of a photo. When you’re shooting one of your projects, when possible take at least some photos showing you or a member of your team doing some of the work (not staring at the camera).
It’s all about light
Photography is about light. Because it’s easiest, you may be shooting most of your work inside your shop. Yet it can be a challenge to get enough light in this setting (and a smartphone flash just doesn’t work very well); plus you have to deal with all the stuff in the shop that can clutter the background. If possible, move the boat outside where you can take advantage of natural lighting and a more attractive background.
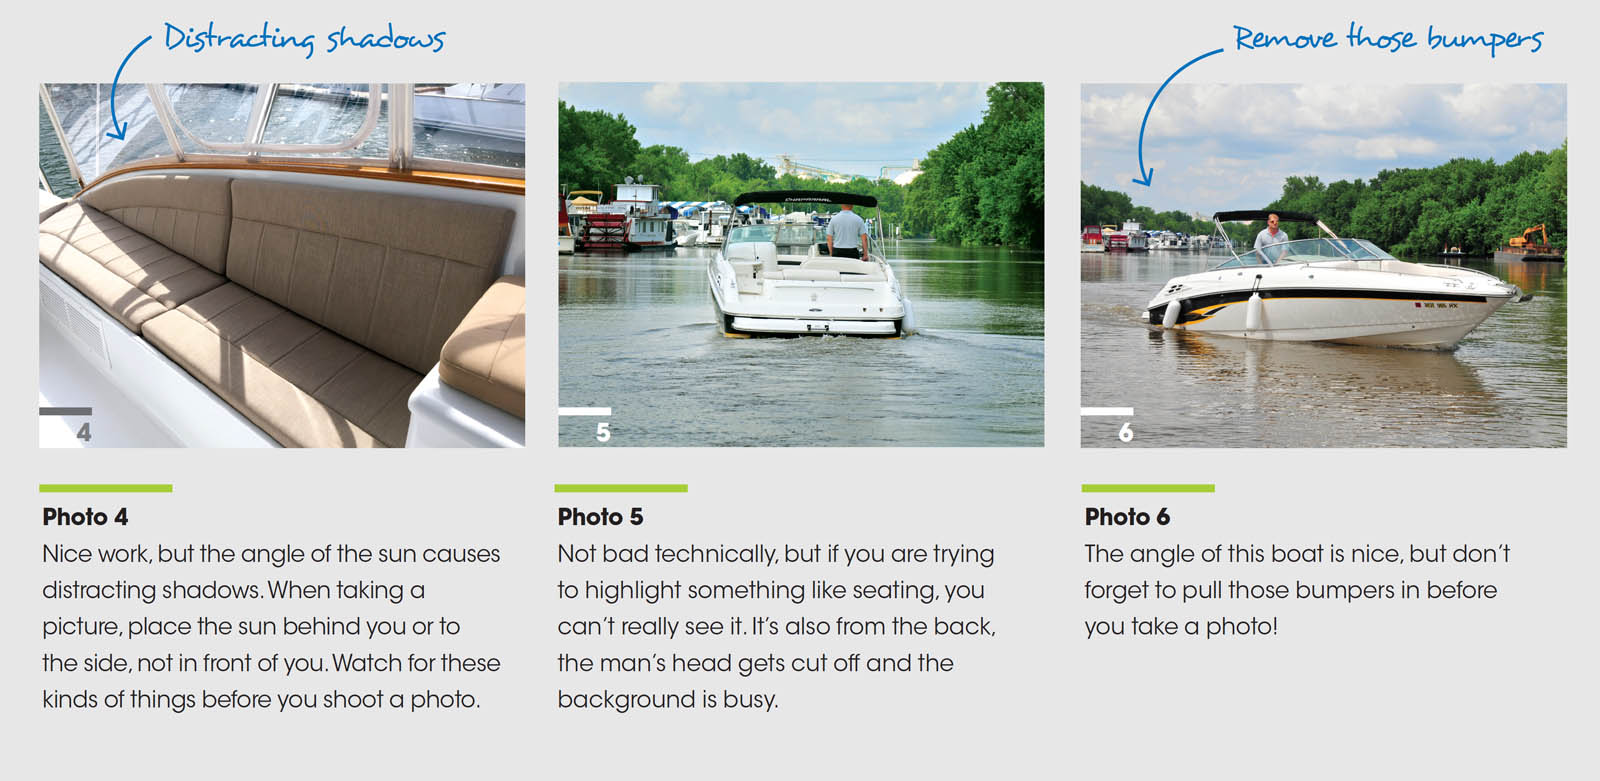
Important tip: for the most pleasing colors, shoot your pictures when the sun is low in the sky—early morning or late in the day—and make sure the sun is either behind you or to the side. Often the best photos are of the boat actually in the water, but because setting up such shots requires a lot more work, it’s not always practical.
Also, a lack of adequate light makes it hard to hold the camera still long enough to get a photo that isn’t blurry. Try setting your phone on something to help prevent movement.
After you shoot
Once you’ve shot good photos, you’re not off the hook quite yet. Getting the photos from your phone to their final destination can be a challenge as well.
A problem is that photo files sometimes get compressed when saved to a computer or an online photo storage site, or when they are emailed. It’s impossible to give comprehensive instructions for how to avoid photo compression, because every phone and computer and online storage site does things in a different way. But, for example, if you have an iPhone, be sure when emailing a photo to select the “actual size” to send, not any of the small, medium or large choices.
Bottom line: keep the originals of your best photos on your phone, or transfer an exact copy to your computer. Then if you end up using a process that compresses the photo, you can always go back and get the original.
This column has just scratched the surface but hopefully these tips will help your photography, whether your pictures end up on Facebook, or in the pages of this magazine.
Jeff Moravec is a photographer and freelance writer from Minneapolis, Minn.


