TEXTILES.ORG
 Triangulation increases productivity and profits
It’s all in the numbers.
Triangulation can be an effective tool to increase your productivity and profit margin. Every canvas installer should familiarize themselves with triangulation. As long as you are able to read a tape measure, you can understand how to use triangulation fairly easily.
Once an installer understands what triangulation can do, they are usually eager to try to incorporate it into their work. Triangulation can be used in addition to your normal patterning medium, whether that is paper or Canvex. While you may be more comfortable with your usual patterning method for the majority of your projects, on those job sites where the wind is blowing hard, or it’s raining, triangulation can save the day. You may find that with practice, this patterning technique can be quicker and easier than your normal medium. And “quicker and easier” can equal money in the bank.
Once you understand how triangulation works, the most important thing is to practice using it.
To properly lay out your triangulation patterns, you’ll need a roll of craft paper (a 4-foot by 60-pound roll is probably the most versatile), one or two dozen #1 scratch awls, a tape measure that will stay hooked on an awl, a small hammer, a few sharp pencils, several straight-edge bars and a long table that you can drive your picks into. (Don’t pound picks into your good mica-topped tables.)
We’ve all had a customer call and tell us they need a cover for a window or hatch blind or a cushion. It’s “simple and little,” it’s “just a square,” and “they’ll pick it up and install it themselves.” Who among us hasn’t been down this road, thinking this is some easy pocket change? Then the customer calls back and says the item doesn’t fit at all. Triangulation provides the missing information.
What shape is it?
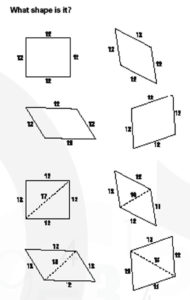 While each of these shapes is 12-inches by 12-inches, only the upper left one is square. With only the perimeter dimensions, you have no way to know what the true shape is. You need to split the 12-inch by 12-inch shape into two triangles and measure the diagonal between them to have the information needed to determine the perimeter shape. Note that I have used the shortest length to measure forthe diagonal.
Transfer to paper
On craft paper, drive in a pick, measure to the right 12 inches, draw a mark and pick. Hook the tape measure on this second pick and measure up 12 inches, draw with pencil in an arc shape by holding your pencil lead behind the tape measure blade at 12 inches. Hook the tape measure on the first pick and measure diagonally 17 inches to intersect the previous arc, and put in third pick. Hook tape on third pick and measure to left 12 inches and draw arc, hook back on first pick and measure up 12 inches to intersect arc, mark and put in pick. Trace perimeter and cut out.
All triangulation layout is this same procedure. Make one triangle, add another and another, and then trace out the perimeter. For your first dozen layouts, don’t worry if you feel uncoordinated while trying to stretch the tape out, line the pencil up correctly, and get a nice smooth arc all at once. It will feel more natural after a few dozen layouts. Until you are sure of yourself, it’s a good idea to double-check your numbers for each triangle before moving on to the next one.
Practicing laying out these four boxes should do a lot to increase your understanding of triangulation.
After you have spent some time experimenting with the effects of the diagonal dimensions, you will start looking around for items to measure. Windshield blinds are often perfect candidates, as are interior blinds, chair covers, cockpit covers, tonneau covers and drop curtains.
A side window blind is a simple cover to measure. If the window has straight lines with no curves, you only need four perimeter dimensions and one diagonal dimension. For a flat cover, like the diagram on page 26, you don’t need an intermediate measuring point. The A-B dimension might be two, six or 10 feet, but as long as that window is flat, you’re fine measuring it as shown.
Measuring a side window
 On the boat, place a small cross-mark on each of the outside corners of the area you want to cover. If possible, leave the marks on the boat for reference when installing the finished product.
Next, make a small drawing in your workbook of the item you are measuring. It’s a good habit to always write “port” and “starboard” on the page, and to mark “in” and “out.” I’ll even note “top” on my work page, and as I proceed to measure, I’ll keep the top of the page toward the top of the cover.
This may sound like overkill but when you get to the point where you triangulate large covers and you’re climbing ladders to get the dimensions, then climbing back down to record them in your notebook, it’s easy to get lost. I note all of these bearing points on every layout.
On the other hand, there are some things you don’t have to be as meticulous about. When you’re measuring, don’t worry about drawing your workbook layout to scale, and your lines don’t need to be perfectly straight.
At the shop, you’re going to take the dimensions from your workbook layout and transfer them to paper, thus creating your pattern. Measure out one triangle at a time. I always tell people not to think too much when they are putting the layouts on the craft paper. Just do what the numbers tell you to do.
(Note: All of the A,B,C,D reference points in these instructions are only to guide you through the layout steps, I would not have these on the actual layout.)
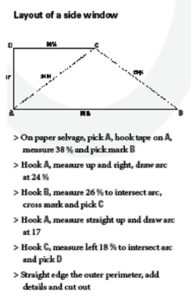 To transfer the side blind dimensions from your workbook to a pattern, roll out 3 ½ feet of paper on the table. On the bottom edge of the paper hammer in two picks to give yourself a 38 ¼ horizontal space. This will represent the dimension A-B.
Hook the end of your tape measure on the (A) pick. Line up your pencil with the 24 ¾ mark on the tape blade. Now, while holding the tape measure blade taut, mark out a sweeping arc on the paper, upward and to the right. Next, hook your tape on the (B) pick and measure over 26 ½ and mark where it intersects the previous arc. Put your third pick (C) there. This is your first triangle.
Now it’s time for the next triangle. From (A) pick, measure up and mark the 17-inch dimension in a sweeping arc. Move your tape to (C) and measure left 18 ¼, then mark and pick that intersection (D). Lay your straight edge bar on the outside of the picks and draw the finish line of your cover. Remove the picks, cut on the lines, and that’s your pattern.
Windshield blind
 Let’s go back to the boat and measure another easy cover—a windshield blind. For starters, try one that consists of two or three flat windows and does not wrap around the side of the boat. Put your cross marks on the fiberglass where you want the finished edge of the cover to be. Lines A-1 and B-2 represent the natural breaks of the structure, where the seams would be. Draw your outboard diagonals so that they go the same direction. If you keep your perimeter numbers similar on the port and starboard sides, you’ll be able to double-check your measurements as you go along. Remember, each line must have a number.
Before I leave a job, I always take a minute to make sure that each line in my notebook has a number attached to it, and that all of the numbers “look” right. (For example, if one diagonal was 48 ½ and the other was 39 ¾ inches, I would know I needed to go back and remeasure.) I also mark any additional information I might need on the same page: cutouts, the color of the fabric, etc.
Back in the shop, roll out about 8 feet of paper on the table. Move in about 2 ½ feet from cut edge and proceed.
Center
- Start with lower center section, pick 1, hook tape on 1, measure 24 ¼ to right, pick 2
- Hook 1, measure up and draw arc at 28
- Hook 2, and measure diagonally 36 to intersect previous arc, cross mark and pick A
- Hook A, measure to right and draw arc at 20 ¼
- Hook 2, measure up 28 ¼ to intersect arc, cross mark and pick B
Starboard
- Hook 2, measure to right and draw arc at 23 ½
- Hook B, measure diagonally 34 ¾ to intersect previous arc, cross mark and pick 3
- Hook B, measure to right, draw arc at 24 ¼
- Hook 3, measure up 25 ¼ cross mark and pick C
Port
- Hook 1, measure to left and draw arc at 23 ½
- Hook on A, measure diagonally 34 ¾ to intersect previous arc, cross mark and pick 4
- Hook A, measure to left and draw arc at 24
- Hook 4, measure up 25 and pick D
When you’ve checked your measurements, draw in the perimeter lines. If the cover needs seams, mark the verticals A-1 and B-2, as these are the natural breaks in the boat. Add the other detail notes from your layout.
This is your windshield pattern, ready to be cut and sewn.
What I’ve shown you are just a couple examples of items that can be patterned by triangulation. With practice, patience and attention to detail, anyone can learn to master this important skill.
Carol Dykes is owner of C-Worthy Corp., Pompano Beach, Fla.
Tools
- Scratch awls (#1) or picks
- Craft paper (60-pound)
- Small hammer
- Straight-edge bars
- Sharp pencils
- Tape measure
- Table with soft top
- Scissors or utility knife
- Framing square
- Masking tape
Measuring Tips
- Cross mark outermost edge of flat item.
- Draw layout of item’s perimeter in notebook.
- Note position details: out, up, port, starboard.
- Draw in diagonal lines; utilize the shortest distance between points.
- Note dimensions of each space on layout.
- Measure perimeter first, then diagonals.
- Measure in inches, not feet and inches.
- Number each line: Each line must have a number.
- Check symmetry of layout and numbers.