TEXTILES.ORG
 Working with pattern angles
This article is a preview of our hands-on presentation at the Marine Fabricators Conference this coming Jan. 14-16 in Clearwater, Fla. I want to talk about manipulation of pattern angles for both better quality and less time spent patterning. I will attempt to simplify and not talk about one-step patterns here. Most really large jobs require a two-step process because of size and weight.
There are three basic visors that can be made by using just the top pattern: straight down, 45-degree and straight back. By far the most used is the 45-degree, which is a straight strip. There is custom angle, as well, and understanding this concept is important to high-quality fabrications. This is how we do it.
Photos 1-3: These photos chronicle our first trip to the boat. The bimini pattern is made, followed by our forward and aft patterns. The entire purpose of bringing the forward and aft patterns on the first trip is to establish the correct visor angle. There is no need to mark fasteners; just a quick stick is all that is needed. The same forward and aft enclosure patterns will be used again on the second trip. We marked our frame line with a Sharpie four times, one on each end of the bimini, and again at the top of the forward and aft panels. It is imperative to draw your frame lines as close to the same as possible while each of the three pieces is in place. When removed from the boat and laying flat on our tables, our bimini lines will not be the same as our forward and aft enclosure lines. The reason for this is the key to understanding angles.
-
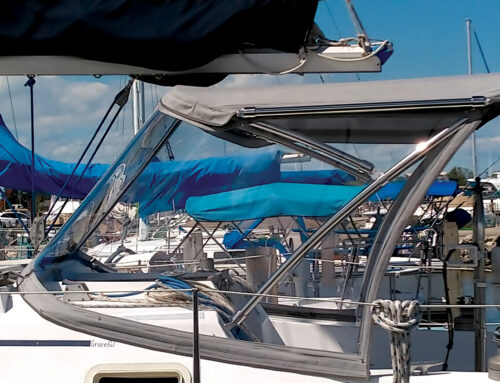
- 1) A Hood Bimini Enclosure on a 38-foot Sea Ray. It was a re-cover, but took considerable work on the frame, including new fittings.
-
- 2) A Hood Bimini Enclosure on a 38-foot Sea Ray. It was a re-cover, but took considerable work on the frame, including new fittings.
-

- 3) A Hood Bimini Enclosure on a 38-foot Sea Ray. It was a re-cover, but took considerable work on the frame, including new fittings.
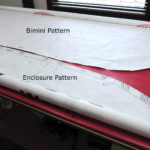
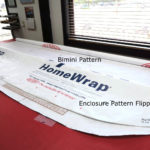
Photos 4, 5: These two photos tell a big story. They are actually from a one-step, but the principal is the same. The bimini pattern is in the background and the aft enclosure pattern is in the foreground. We have cut the patterns on the finished size line or the lines we drew on the boat. The corners of the bimini and the points on the enclosure pattern meet at the corners of the bimini. In the second photo, our enclosure pattern has been flipped on top of the bimini pattern. Notice the curves are different: The curve at the top of the enclosure pattern is at the precise enclosure angle, we use this pattern flipped the way it is to make our visor from. However, the bimini pockets are made using the bimini pattern curve. This knowledge is essential to moving onto one-step processes, no matter what your fabrication style is.
-
- (4)
-
- (5)
Photos 6, 7: Now that we have fabricated the bimini with the correct visor angles, we can now sew our zippers to our pattern pieces. This speeds up the pattern process at the boat. Minor corrections can be made with darts at the boat. Our visors finish to 2½ inches, so in our case we draw a uniform 2½-inch Sharpie line down from the top of the forward and aft enclosure pieces. The zippers get stapled and sewn on this 2½-inch line starting at the center and working each way. The two side enclosure blanks get the zipper sewn on a straight line 2-inches down. Be sure to stretch and pin out the sides of the bimini before marking the zipper start and stop points or you will have issues at the boat.
-
- (6)
-
- (7)
Photos 8, 9: Back at the boat, we fit our bimini and zip on all our enclosure patterns. Be sure not to install sliders or end stops. We run them off the end after the zipper is together. We do not want their bulk during patterning. Pull down tight and mark fasteners and corner match points. In photo 9, notice the wrinkled mess below the windshield; this is by design. We have double-sided tape holding the middle of the pattern to the edge of the windshield, where we need to tuck under to the fasteners. There is no need to cut our pattern, as it can be hard to reach. We mark the windshield horizontally along its edge with a Sharpie, just at the point that it tips to the underside. Now we find neutral spots in small areas where the pattern is flat just above each fastener. Between the fasteners there is now excess pattern. Make a dart by tucking the paper under itself until it lays flat between the fasteners. Using our marker, we make a couple of hash marks across every fold.
-

- (8)
-
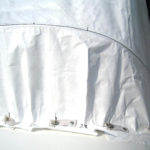
- (9)
Photos 10–12: Back at the shop, with our pattern flat on our tables, we have lines drawn from our hash marks to a point at the rail in many places. This is the extra material that needs to be removed to put the shape back in our pattern. In the second photo, we have cut and taped each dart. Now our pattern will no longer lay flat and if we were to bring to the boat now, it would fit the contour perfectly. Having a pattern not flat at this stage is of no use. We need to cut along the rail line so the pattern will again lay flat. Notice the opposing curves at the rail line. The difference now is that we can hide the seam line with a rail mask. The completed panel will have two pieces of clear joined at the rail forming the belly in our panel. Proper sequencing dictates that we would install our smile and bottom fabric first before seaming our clears at the rail while the panels are flat and smaller.
-

- (10)
-

- (11)
-
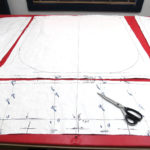
- (12)
Mark Hood, MFC, and his wife, Deb, own and operate Hood Marine Canvas LLC – Marine Canvas & Training Workshops in Merrimac, Mass., e-mail mark@hoodcanvas.com, or visit the Hood Canvas Facebook page.